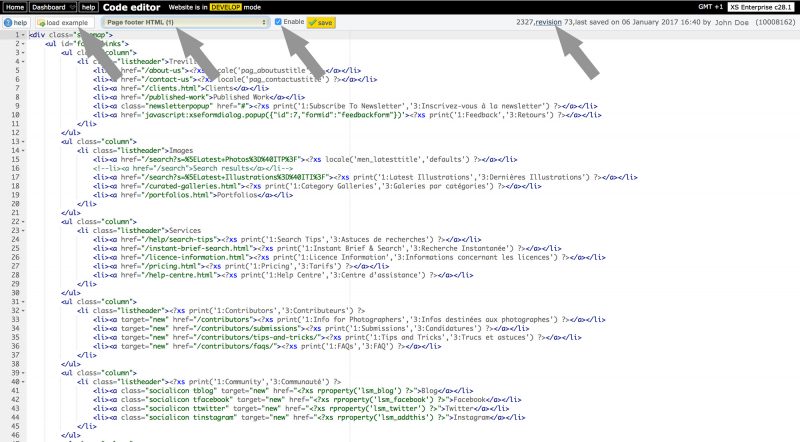
The built-in code editor is used to write your own CSS, to edit script and to create custom templates.
Recommended reading
Introduction
You will find the code editor in the main menu (or dashboard) when logged in with an account that has permissions to use this function.
The code editor is simple to use. XS allows you to create custom versions of templates and page fragments, such as the page header/banner, the footer, pagination bars and so on. You can of course use the standard templates and tweak those with the settings in Back office and perhaps some CSS. But you can also completely customise these templates. The editor is further more used to edit CSS and Javascript.
Depending on what you want to do, certain skills are required. E.g. to change the CSS you’ll need to understand HTML and CSS. If you want to create custom templates, then you should familiarise yourself with the XS coding language. You can find plenty of resources about this subject in the Knowledge base. Before you start using the code editor, you should read the articles Infradox XS Customisation and Using custom CSS first.
Locking the editor
If you want to make changes to a file, you’ll have to lock the editor. To do this, click on the Lock button. The page will now reload and it will display your name to indicate that you have locked the editor, and that you are now the only one who can make changes. When you are done, remember to unlock the editor again.
The file dropdown box
In the toolbar (see screenshot at the top) you’ll see a dropdown box (or menu) which lists the names of files that you can customise or create. Not all files are templates or page fragments, the list also shows the CSS files that you can edit. Page fragments are templates that you insert into other templates. For example, the pagination toolbar template is a page fragment. It’s inserted into pages where thumbnails are displayed. In the dropdown, choose the file that you want to change. It will load into the editor window. Note that it will be blank if you haven’t customised the file yet.
The Load example button
After you have selected the file that you are going to change as described above, you can click on the Load example button to display a dialog with available code examples – for the file that you are going to change. Select the radio button in front of the template that you want to load and click on Use code at the bottom. This will load the example code into the editor – so if you have already made changes, make sure to copy the original file’s content first.
Enabling custom versions
Some of the files need to be enabled with the box next to the file dropdown. As long as the checkbox Enable is unchecked, it is not going to affect the client facing pages. Don’t forget to check this box before saving your file. This also allows you to revert back to the original file whenever you want or need to do that. Just load the file in the code editor, uncheck the Enable checkbox and save your file.
Revisions
At the top right, the name of the person who last saved changes is displayed alongside the information about the date and time. In front of this you’ll see Revision followed by a number. The number tells you how often a file has been saved. If you want to go back to an earlier version of a file, then click on Revision. A dialog displays with the most recent versions, ordered from newest to oldest. It also shows who saved that version and when. You can select a version that you want to revert to with the radio button in front of it, and then click Restore to load the code into the editor. This doesn’t affect anything until you click on Save in the toolbar. You can also go forward again. E.g. you can load the latest version that you saved after you restored an older version.
Syntax highlighting
The editor supports syntax highlighting and it will display warnings and or errors in the sideline. It can however not check the syntax of the Infradox coding language (i.e. the tags, widgets, condition blocks and so on).
Code parsing
When you save your file, different things will happen on the server. This depends on the type of file that you are saving. CSS and Script files are compressed and the output is written to the siteowner folder of the website. Its file name has a revision number – to prevent problems with browser caching.
If you save a HTML template, then the XS parser will optimise the file. If it finds errors then it will tell you that the file couldn’t be saved. The parser does provide some error checking. For example, it will find unclosed XS tags et cetera. However, its error checking capabilities are minimal and you have to make sure that your code is correct before trying to save it. In case there are problems, you can restore a previous version or you can disable the custom version of your file as described above.


