The Job server function lets you create and schedule different jobs that are executed on the server. You can create jobs to export data, to process metadata updates or to delete files based on a data file that you can upload. Furthermore you can create payment run jobs.

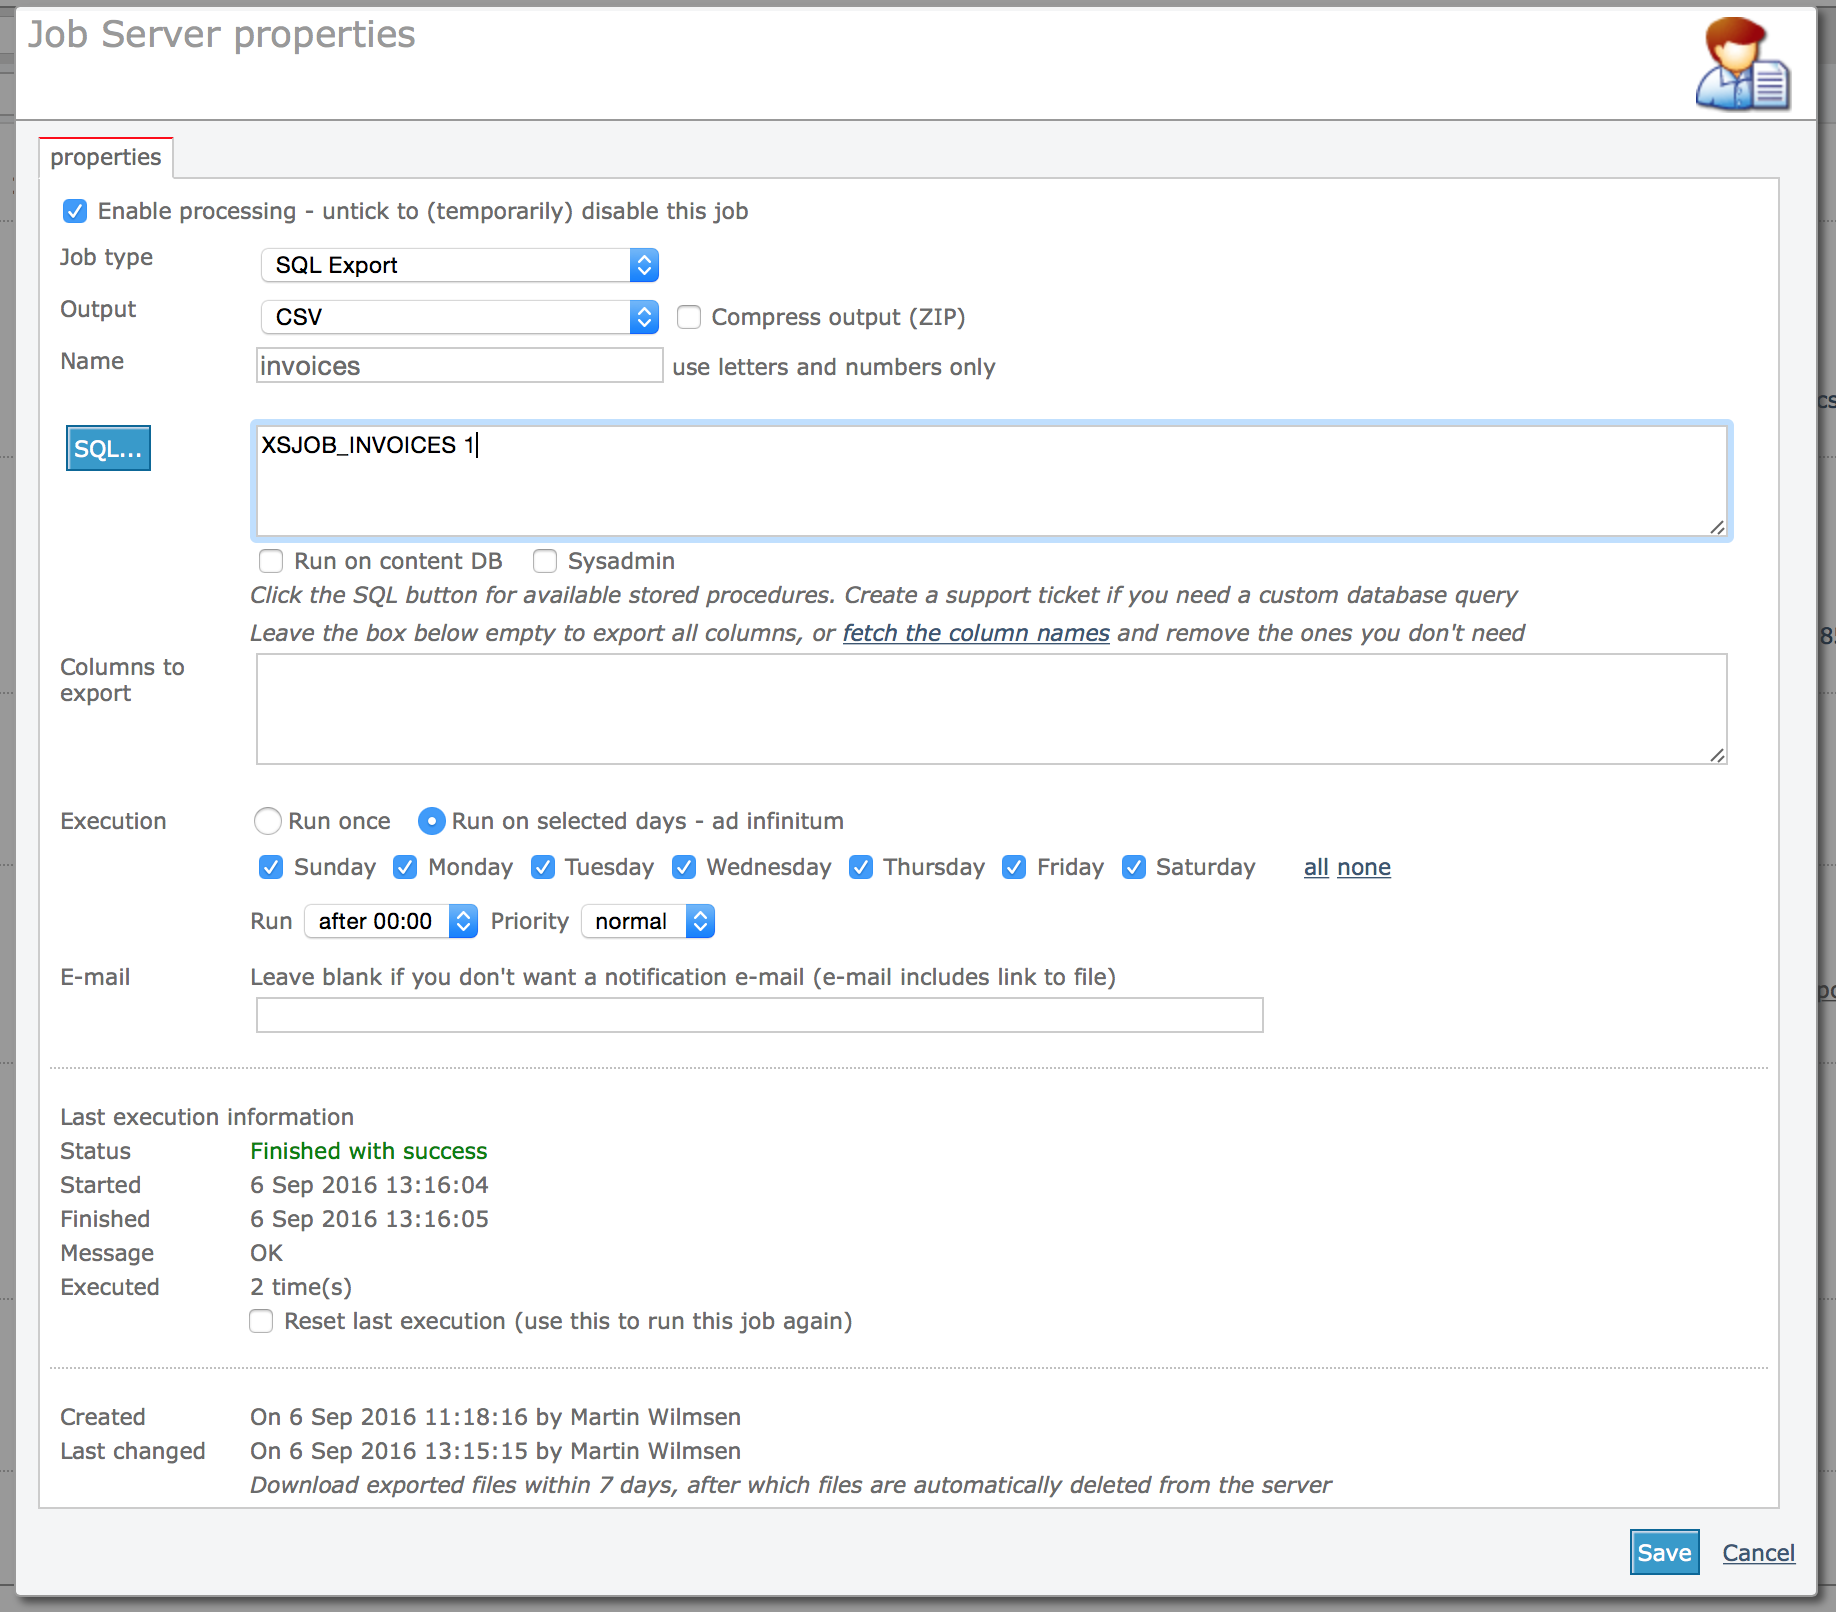
Example screen shot showing how to automatically export invoices on a daily basis
Related articles
Adding a new data export job
Go to Site Configuration in backoffice, and click on the Job server icon. An overview of current jobs will appear (if any). To add a new job, click on the New button in the toolbar. A job server properties dialog will open.
- Check the Enable processing checkbox. To (temporarily) prevent a job from being executed, untick this box.
- Select Job type SQL Export.
- Select a value for Ouput.
Currently you can only select CSV. CSV files contain comma separated values and a header row. You can open these files in Excel or with a plain text editor. - Compress output
Check this box if you want to have the resulting file compressed in a ZIP file. The file will be smaller and quicker to download. - Enter a name.
Use a name that shows what the export is about. This name is also used to generate names for output files created by Job server. - SQL.
In the SQL box you can enter a predefined query which must start with XSJOB. Other SQL queries are possbile but can only be entered by the system administrator. You can click the SQL button for an overview of predefined queries. Click on a name to copy the SQL into the box. Then change the parameters. E.g. XSJOB_USERS [days],[includeorganisations]. The parameters are between brackets. You must replace the parameters (including the brackets). For example XSJOB_USERS 7,1 to export new users that were added in the last 7 days and include organisation info.
Stockindexonline: In version 27.5 a SQL stored procedure has been added to export data for Stockindexonline. Click on the SQL button and select the SQL. Replace the parameters with the number of days (e.g. 365) and between apostrophes the name of your website. E.g. www.mywebsite.com. - Run on content DB
This box should be left unchecked unless your content database is not the same as your website database. - Sysadmin
This box will be checked if a sysadmin created a query for you. You can not change the query yourself if this is true. - Columns to export
After you have entered the query to use, click on the link “Fetch the column names”. This will put all the column names in the “Columns to export” box. You can then remove the column names (fields) that you don’t need. This is also a good starting point for CSV Metadata update jobs, which is described further down. - Execution
Select Run once if you want the job to be executed only one time
Select Run on selected days if you want the job to be executed more than once. E.g. daily, or once a week on Friday etc. - Days
Select the day or days on which you want the job to execute. If you select Run once, then you can select only one day. - Run after
Select an hour after which you want the job to execute. E.g. you may want jobs to executed when your website is not busy because certain jobs may have an impact on database performance (e.g. large metadata exports). - Priority
Although Job server is a multi threaded application, jobs are executed one after another to minimize performance impact on the database. If several jobs are scheduled, you can use the priority parameter to changed the order in which jobs are executed. - E-mail
If you want a notification by e-mail when the job is done, then enter an e-mail address. You will also receive a notfication if a job fails. The e-mail will include a link to the generated file (in case of an export). If you don’t want notifications, then leave this field empty.
When you are done, click Save. The dialog will close and the job overview will reload.
Checking the status of a job and downloading files
The job overview will show the status of a job. I.c. when did it start, when did it finish, how long did it take and what was the status (running, finished or finished with errors). You can click the Refresh button in the toolbar to reload the job list, it will not refresh automatically.
If a job has finished with success then the overview will display the name of the file that was last generated. Click it to download the file. If a job has executed more than once, then you can click on the Folder link to show a list of all the files. In this list you can click on a name to download that file.
Note that you also configure jobs to send you an e-mail with a link to the downloadable file.
Restarting a job
If you want to run a job again or if a job has failed, then click edit to open the job properties. If necessary, check the error message and correct the problem.
Check the box Reset last execution and save the job. In the overview you will see that the last start date now shows Waiting for next run.
Deleting jobs and files, and deactivating jobs
You can keep jobs in the overview as long as you want but note that exported files are automatically removed after 7 days – so make sure to download your files in time (you can of course always run a job again).
If a job is scheduled to run only once then you can consider deleting it when it’s done, or you can disable it by editing its properties.
CSV Metadata update jobs
You can update the metadata of files already online by uploading a CSV file with only columns for fields that you want to change. For example only the keywords. It is recommended to use a CSV file previously exported with the Data export job function, because such a file will have all the correct/valid column names. The CSV file that you upload must have a header row with valid column names and at least the column ID (the column header must have ID). The ID column must have the Infradox file numbers which are used to find the rows to update in the database.
Further instructions will show in the job server properties dialog after you have changed the Job type dropdown box to CSV Metadata update.
Note that the CSV file that you upload must have comma separated fields/columns, and it must use quotes (“) as the text delimiter. If not, the update will fail.
An example of the process
For this example, we want to update the headlines and keywords of all the files from supplier 123.
Exporting CSV
- We’ll first export the metadata of the supplier’s files to CSV (a text file with Comma Separated Values).
- Go to Site configuration, Job Server and click on New to add a job. The job server properties dialog will show.
- Tick Enabled at the top and select SQL Export in the dropdown box, and select CSV in the output box. Enter a name for a job, e.g. exportsupplier123.
- Click on the SQL button and choose Metadata of files from supplier x. Then in the text box change the text [supplierid] to 123 (so the square brackets must also be removed).
- Click on Fetch the column names. All exportable columns will appear in the box below. Remove the columns that you don’t need. For this example, only the columns ID,HEADLINE,KEYWORDS should remain.
- Click the radio button Run once and tick the box for today (e.g. Friday). Then select Run after 00:00 to make the job run as soon as possible.
- Finally, click Save. The job will show in the overview and it will execute within a few minutes.
- You can click Refresh in the toolbar to see that status.
- Once the job is done, you can click on the file name of the CSV file that has been created for you to download the file.
Editing the CSV file
- You now have a file that contains the unique ID’s that are required for the update job you’ll be creating later.
- Open the CSV file in e.g. Excel or LibreOffice Calc or another spreadsheet/CSV editor.
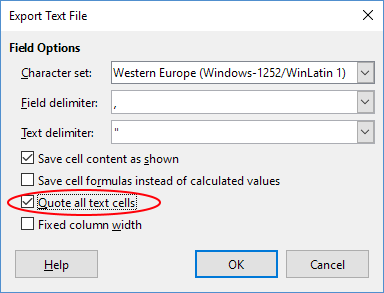
- IMPORTANT When you open the file in your software, a dialog may appear showing different options and settings. Make sure that you specify that the file is COMMA separated, that the text-qualifier is a quote (“) (sometimes called Quoted fields as text, or Quote delimited), and that the character set is Unicode (UTF-8).
- Edit your file as required, and when you save the file, make sure to save it as a CSV file with the settings > comma separated, quote delimited, UTF-8.If you use LibreOffice Calc (free spreadsheet software for both Mac and Windows):
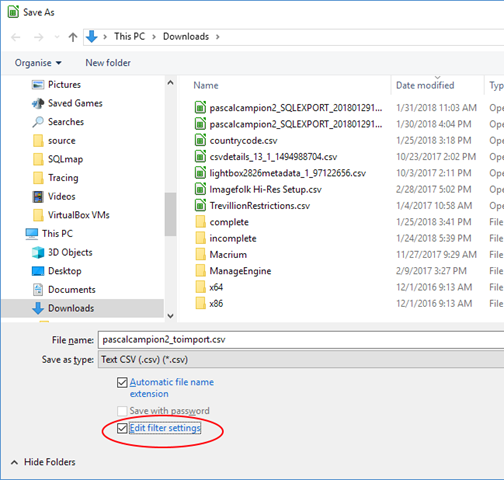
Save your file with “Save As”, and then tick the “Edit filter settings” checkbox. You’ll see the export text file dialog when you continue. Make sure to tick the box “Quote all text cells” (see below screen shots).


Importing the CSV and applying updates
- We can now add a new job (as described above) to apply the changes to the files in the database.
- In the job server dialog, select CSV metadata update for the job type and enter a name for your job (remember to also tick the Enabled box at the top).
- Click on the upload button or drag the CSV file onto the button to upload it to the server.
- Select Run once, tick today’s day box and select Run after 00:00 and save your job.
Once the job has been executed, click on it to open the dialog again. On the Execution info tabsheet you can check if everything went well.
For example it may show:
| Finished with success | |
| Started | 27 Jan 2018 12:58:30 |
| Finished | 27 Jan 2018 12:58:31 |
| Message | 12:58:31 pm Start importing rows 12:58:31 pm Imported 5 records in temporary table 12:58:31 pm Start processing of 5 records 12:58:31 pm Updateable columns: HEADLINE,KEYWORDS 12:58:31 pm Finished import — 12:58:31 pm Records successfully processed: 5 12:58:31 pm Removed input file supplier123update.csv |
Note that after an update or delete job has completed, the input file will be removed from the server.
In version 31 or later, you can also create Metadata update jobs with CSV files that don’t have the unique Infradox ID but another column with unique values. E.g. the original file name, codes stored in the Objectname column and so on.
CSV Delete files jobs
To delete many files from the database, you can upload a CSV file with either the unique 8 digit Infradox numbers, or with your own unique id’s stored in another column such as ‘objectname’. If you use the Infradox generated id’s, then the CSV file must have a header row with the column ID. If your data file (CSV) has other identifiers then the first row of your data file must have the name of that column, e.g. OBJECTNAME – and you must select the correct column in the “Look up values column” dropdown box. Note that you must use unique values. If for example you upload a CSV file with original filenames, and there is more than one file using the same file name, then all those files will be removed. Further instructions can be found in the job server properties dialog after you have changed the Job type dropdown box to CSV Delete files.
Supplier payment run jobs
Please read the article Payment runs / Sales reports to learn how to use this function.
Invoice payment run jobs
Read our article Invoice payment runs to learn how to import and process invoice payments.
Controlled vocabulary exports/imports
You can export words from your CV and then import modified files again. For further information, please read Working with the controlled vocabulary.


