Introduction
Infradox websites on version 32.42 have support for automatically renewing subscriptions that can be bought and paid for online via Stripe. This article describes how you to configure subscriptions via your Stripe dashboard.
Recommended reading
On the Stripe.com website
If your website already uses online payments via Stripe, then you can proceed to the paragraph about Configuring the Web hooks below.
Create an account
If you haven’t already done this, go to www.stripe.com and create an account. Follow all the instructions, the Stripe website will guide you through the process.
Important: The account must be fully configured but it must remain in “Test mode”.
To make sure that it is, go to dashboard.stripe.com – the switch “Test mode” on the top right must be on.
Configure the Web hooks in your Stripe dashboard
On the Stripe dashboard page, click on “Developers” on the top right. If you can’t find it then enter “Web hooks” in the search box and then click on “Developers > Web hooks”.
If you are already using Stripe for online payments, then you’ll already have the required endpoint. If not then follow these steps:
- Click on “Web hooks” in the menu on the left
- Click on “Add endpoint” on the top right
- Enter your domain name starting with https:// and add /stripe at the end. For example: https://www.mywebsite.com/stripe (www.mywebsite.com must be replaced with your own website name)
When the endpoint is created, click on it and then click on the button with three dots next to the endpoint name (below screenshot) – then click “Update details”.

The following events must be sent to the web server:
- invoice.payment_succeeded
- checkout.session.expired
- checkout.session.async_payment_succeeded
- checkout.session.async_payment_failed
- checkout.session.completed
- customer.updated
- customer.deleted
- customer.created
- customer.subscription.updated
- customer.subscription.resumed
- customer.subscription.pending_update_expired
- customer.subscription.pending_update_applied
- customer.subscription.paused
- customer.subscription.deleted
- customer.subscription.created
- payment_intent.amount_capturable_updated
- payment_intent.canceled
- payment_intent.created
- payment_intent.partially_funded
- payment_intent.payment_failed
- payment_intent.processing
- payment_intent.requires_action
- payment_intent.succeeded
Make sure that you have selected all of the above events and finally click on “Update endpoint” to save your changes.
Payment links
Click on Payment links in the sidebar of your dashboard on the Stripe.com website – and the click New on the top right to create a link.
Payment page
Click inside the “Find or add a product” input box, then click on “Add new product” to open the new product dialog. Follow the instructions in that dialog i.,e. enter a name and description et cetera.
- Make sure to select Recurring and to select the correct Currency (must match your website’s default currency).
- The correct option for the setting “Include tax in price” depends on your requirements. Refer to the documentation on Stripe for details: Stripe tax behaviour
- Select Monthly for the billing period.
Save the product and then tick the “Collect tax automatically” checkbox in the options section.
After payment
Select the radio button “Show confirmation page” and then tick the “Replace default with a custom message” checkbox. You can now enter your own confirmation text, for example:
Thank you for your business. You will receive a confirmation e-mail with instructions.
To activate your subscription without the e-mail, go to My account and click on “Refresh my account”.
Finally click on the “Create link” button on the top right to save it.
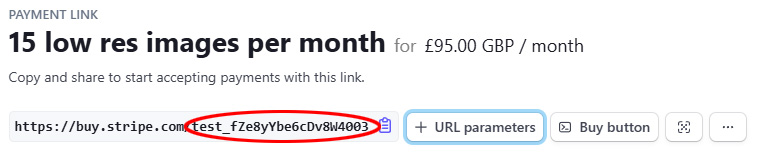
Copy the payment link id and the price id
The payment link id (see screenshot) is what you’ll need when you create the subscription on your Infradox website. You’ll be able to access this later on via Payment links in the sidebar of your Stripe dashboard.
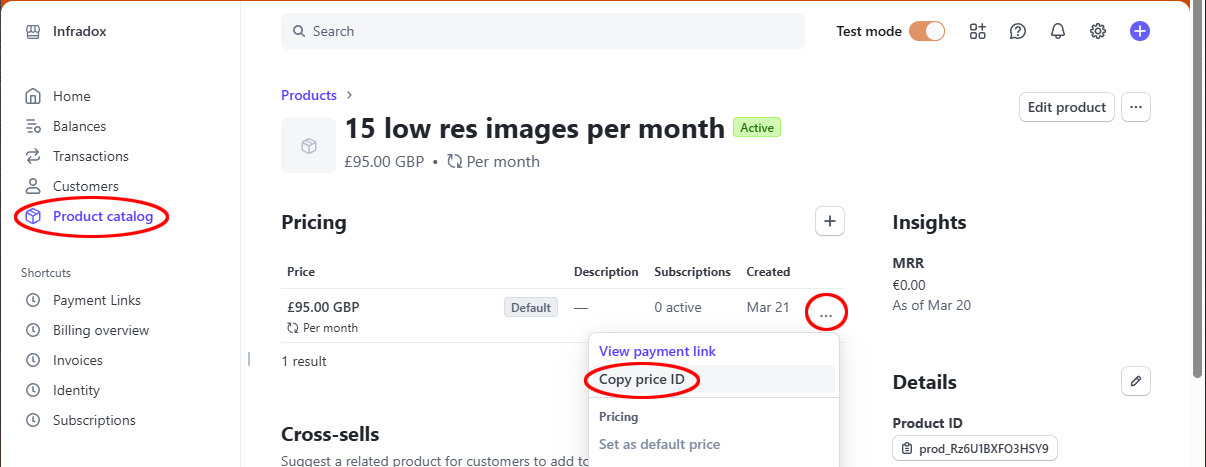
To find and copy the price ID, click on Product catalog in the sidebar and then click on the button with the tree dots to display the menu. Click on Copy price ID to copy it to the clipboard.
Configure the customer portal and other Stripe subscription settings
Go to https://dashboard.stripe.com and in the search box enter “customer portal”. In the suggestions click on “Settings > Billing > Customer portal”.
Copy the Customer portal link.
In another browser tab, open your own website and go to Site configuration > Online payments – section “Invoicing, Currency and Customer portal“.
Copy the Customer portal link that you just copied into the Stripe customer portal input box.
If you use backoffice for invoicing and payment runs then it’s recommended to enable the setting “Automatically create subscription invoices after receiving Stripe subscription payments“. Note that this is about invoices that your website creates, not the invoices that Stripe creates. Also, you can have invoices generated automatically without making those invoices visible to the end user if you prefer.
Finally, Save your backoffice settings.
Back on the Stripe website, scroll down to the section “Cancellations” and make sure that the setting “Cancel subscriptions” is on and that “Cancel at end of billing period” is on.
Then open the section “Subscriptions” and make sure that both “Customers can switch plans” and “Customers can change quantity of their plan” are both off.
Finally complete the rest of the settings on this page as needed – note that their are several important settings, especially in the “Subscriptions and e-mails” section that you can select at the top of the page.
On your website
Before you begin!
Working with subscriptions on your website (whether you use normal or Stripe subscriptions) requires some important changes to be made to your website (templates and script). Without these changes the process will not work. So before you continue with the following steps, make sure that you’ve already made the required changes that are described in the paragraphs Technical implementation in this article: Price agreements and subscriptions
Adding a subscription in backoffice
Go to User management and click on Agreements in the toolbar. Then click on Add agreement in the dialog.
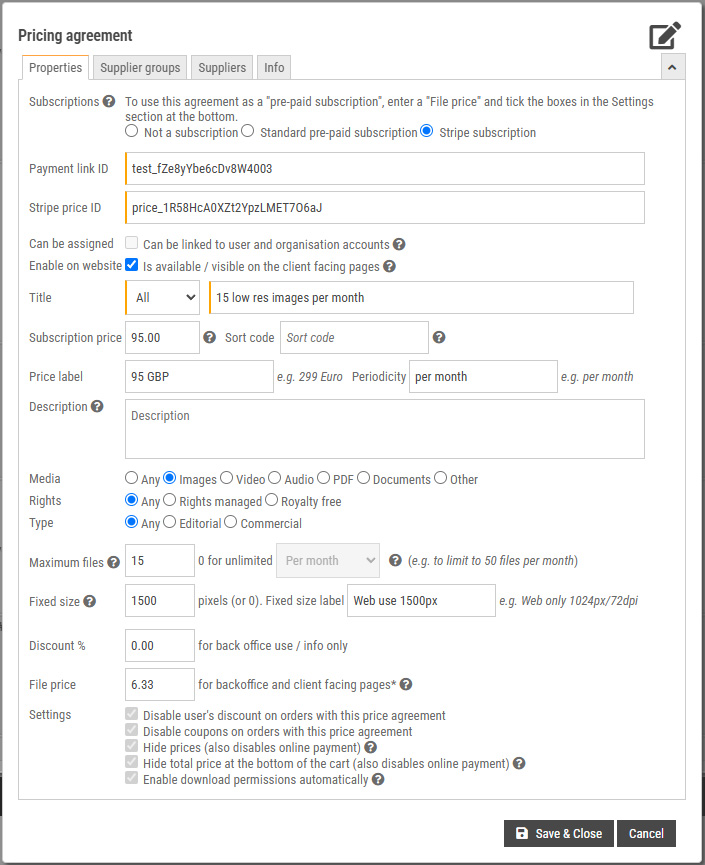
Select the “Stripe subscription” radio button and then paste the Payment link id and the Price id that you copied from the Stripe website into the input boxes (paragraph Copy the payment link id and the price id above).
Enter the rest of the settings. For more detailed information about creating price agreements and/or subscriptions, please read Price agreements and subscriptions.
Although the label of the subscription can be different from what you’ve entered on the Stripe website, it’s recommended to use the same name.
The “File price” input box is important for the royalties payments, normally it should be the amount of the subscription divided by the number of downloads / maximum files. However, the subscription price can be higher or lower too.
When you’re done click Save to close the dialog and to make the new subscription configuration appear in the list. Note that it will be listed as “Can’t be assigned“. This is correct, it means that it can’t be assigned manually – only by paying for it through Stripe.
Repeat these steps if you want to add more subscriptions.
Adding the Buy a subscription page
For this example we’ve created three different subscriptions that our customers can buy. The subscriptions page (www.yourwebsite.com/subscriptions) will list the Stripe subscriptions that you have created – using the “sort code” that you have entered to control the order of display. See the below screenshot for an example:

To add a subscriptions overview page, go to the code editor and select template 900 “Subscription list page”. Load the example code into the editor and save it. Then select template 901 “Subscription list detail”, load the example code and save that too. If you now go to /subscriptions on your website you’ll see an overview. Use the code editor to change the page to match your preferences.
E-mail notifications
The system uses a number of e-mail templates to notify website owners and your clients of important matters regarding subscriptions:
- adminnewstripesubscription.txt
Sent to your notification e-mail address when a new subscription is created - adminsubscription.txt
Sent to your notification e-mail address when a subscription has been fulfilled and/or automatically renewed - adminautoinvoicenotification.txt
Sent to your notification e-mail address when a subscription invoice has been automatically created on your website (not the Stripe invoice) - usernewstripesubscription.txt
Sent to your client to confirm that his/her subscription has been succesfully created after paying via Stripe - usersubscriptionendimmediate.txt
Sent to your client to confirm that his/her subscription has been terminated immediately (by an admin on the Stripe dashboard) - usersubscriptionrenewed.txt
Sent to your client to confirm that the subscription has been automatically renewed (after the payment was processed by Stripe)
You can change the text of these e-mail templates as required via Site configuration > E-mail templates.
Note that Stripe also sends e-mails about your subscriptions depending on what you have configured on the Stripe dashboard.
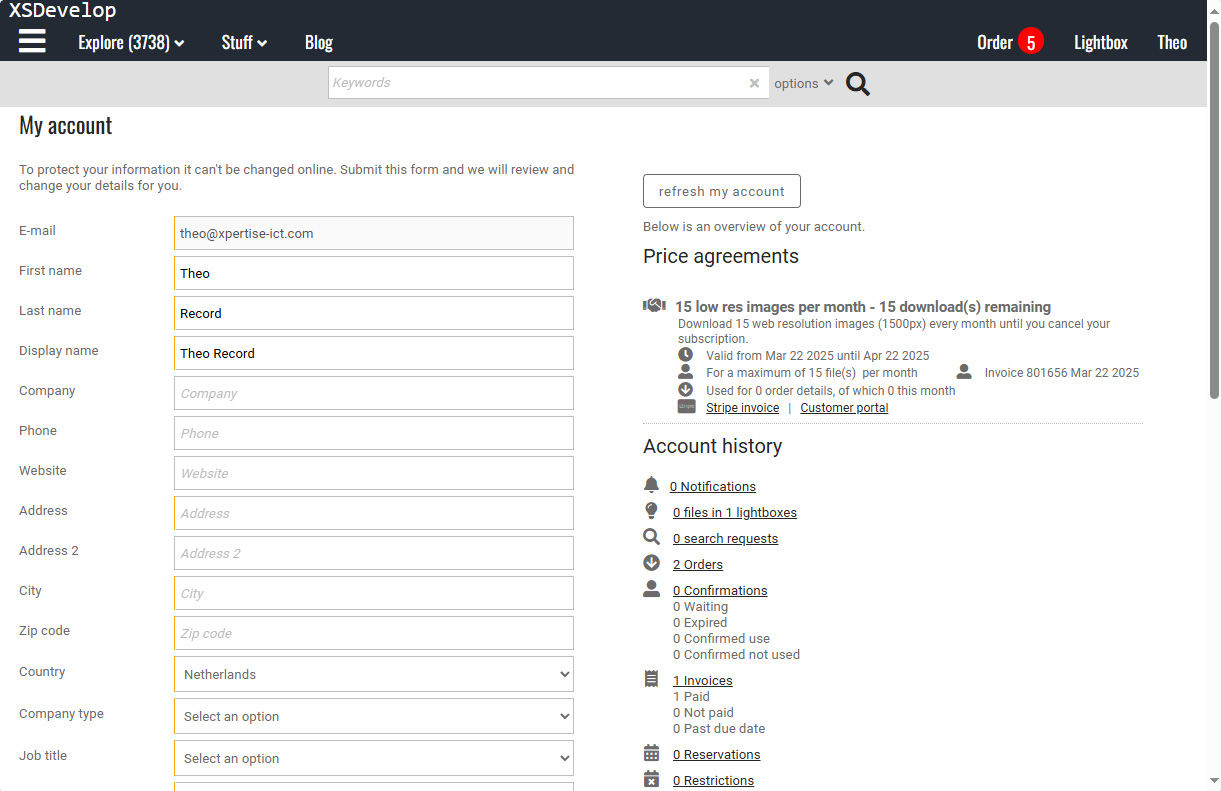
The My account page
Go to Site configuration > Forms in backoffice and open the “My account form” section. Scroll down to “Account information” and make sure that the setting “Price agreements” is ticked.
The My account page also needs a “Refresh my account” button that users can click to activate a new subscription that’s added while the user is already logged in.
When logged in with an admin account, go to /myaccount and click on the editable text area. Then add this code in the editor:
<div class="refreshbox">
<ul class="colorbuttons">
<li><a class="refreshmyaccount" href="#"><span>Refresh my account</span></a></li>
</ul>
</div>
Below is an example of the My account page, showing the “Refresh my account” button and the subscription with a link to the Stripe customer portal.