Introduction
All staff members have a personal list of user accounts called My list. This list can be loaded into the user management view at any time by clicking on the My list” button in the toolbar. When your list is active, the My list button will turn orange.
Lists are intended to give quick access to a specific set of user accounts, for example user accounts that you need to contact. Lists can also be saved so that you can maintain multiple lists, to allow other staff members access to your lists, to bulk update user accounts and to schedule bulk e-mail.
The My list function was introduced in version 32.37. Saved lists and sending bulk e-mail is available in version 32.38 or later.
Screen recording
Scroll down to the bottom of this page to view a screen recording about working with this function to schedule bulk e-mail.
How to add and remove accounts to “My list”
To manually add accounts that are loaded into the view – e.g. after you executed a search – tick the checkboxes on the left of the users in the list, and then click on “Add selected to list” in the My list dropdown. You can click on the checkbox in the header bar at the top of the list to select all user accounts at once. For example, to add all users that have download permissions, select that as a filter in the filter dropdown at the top of the page and then click on “Load list”. Then click on the checkbox in the header bar and then click on “Add selected to list” in the My list dropdown.
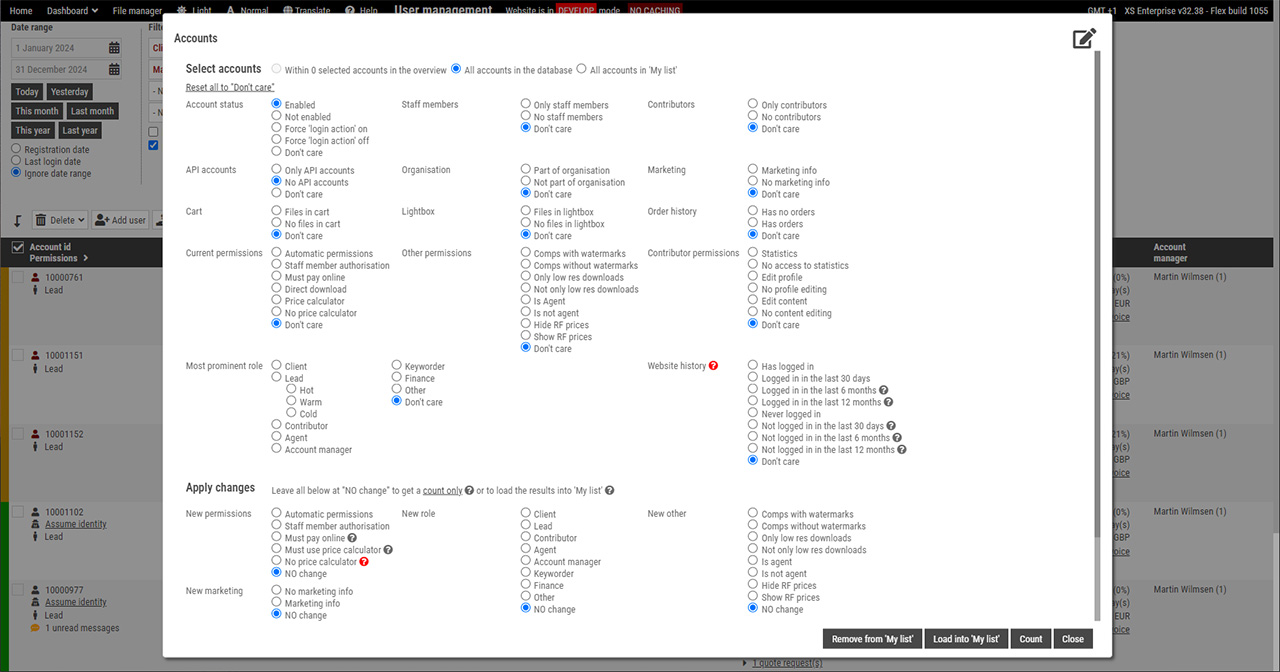
If you want to add user accounts based on specific user properties/criteria, then you can use the “Batch accounts” function. Click on the button in the toolbar to open the batch dialog. Use the radio buttons in the top section of the dialog to define the selection criteria and leave all the radio buttons in the “Apply changes” section at their defaults (you can click the “count only” link to reset all radio buttons to their defaults). Finally click “Load into my list” at the bottom. A confirmation dialog will appear with the options “Wipe current list” and “Append to current list”. Select “Wipe current list” to remove all accounts currently in the list and to then add all matching user account to it. Or the append option to add user accounts to your list. If you want to check how many user accounts would be added first, then click the Count button at the bottom.
You can use the batch dialog to remove accounts from your list too. Simply click on “Remove from ‘My list'” in the dialog. To manually remove accounts from your list (when it’s active), select the ones that you want to remove with the tickboxes and then click on “Remove selected from list” in the My list dropdown. To remove all accounts currently in My list, click on Clear in the dropdown.
Bulk updating accounts in My list
If you want to bulk update the accounts that you have in My list, then click on Update accounts in the My list dropdown. Note that My list must be active (the button must be orange). You can use the bulk update dialog to select what you want to change, e.g. the role, the permissions, the status, the account manager, and currency, tax and discount settings.
Changes that you make with this function can’t be rolled back, so make sure to double check before you click Update in the dialog.
Saved lists
My list is always available for all staff members and it can be activated (i.e. the accounts can be loaded into the view) by clicking on the My list button in the toolbar. If you want to work with more than one list or if you want to send bulk e-mail, then you need to use the “Saved lists” function.
You can create a new saved list to hold the user accounts that you currently have in My list by clicking “New saved list” in the dropdown. My list must be active (the button must be orange). Or if you want to create a new empty list, then first open the Saved lists dialog (click Saved lists in the My list dropdown) and then click “Create new list” in the dialog.
Public and private lists
By default, saved lists are Private. I.e. only you can see the saved lists that you created. If you want a list to be available to other staff members too, then make the list Public. Other staff members will then be able to load the accounts from your saved list into their My list, and they can schedule bulk e-mail for such lists. But other staff members will not be able to add to or remove from your list.
Loading user accounts from a Saved list and updating a Saved list
To be able to load users from a saved list into the view, find the list in the dialog and then click on “Load”. This will clear the accounts currently in My list and it will load all accounts from the saved list into it.
Note that making changes to My list (i.e. adding or removing accounts) does not affect the saved list. If you want to update the saved list with the accounts currently in My list, then open the Saved lists dialog, find the list in the overview, and click on Update.
Copying accounts from someone’s list into a list of your own
Find the list that was created by another staff member in the Saved lists dialog, and then click Load to load the accounts into My list. Now click “New saved list” in the My list dropdown to create a new list with the accounts that you just loaded.
Note that the staff member’s list must be made Public or you won’t see it in the overview. Also note that loading the accounts will clear out My list – so you may want to persist it in a saved list first.
Checking if a user is part of Saved lists
To see if a user is in one or more lists (yours or from others), open the user dialog and click on the Activity tab. Note that this will show info about all saved lists, yours and Saved lists from other staff members. It will not show whether or not an account is in any user’s My list (so Saved lists only).
Sending bulk e-mail to users in a saved list
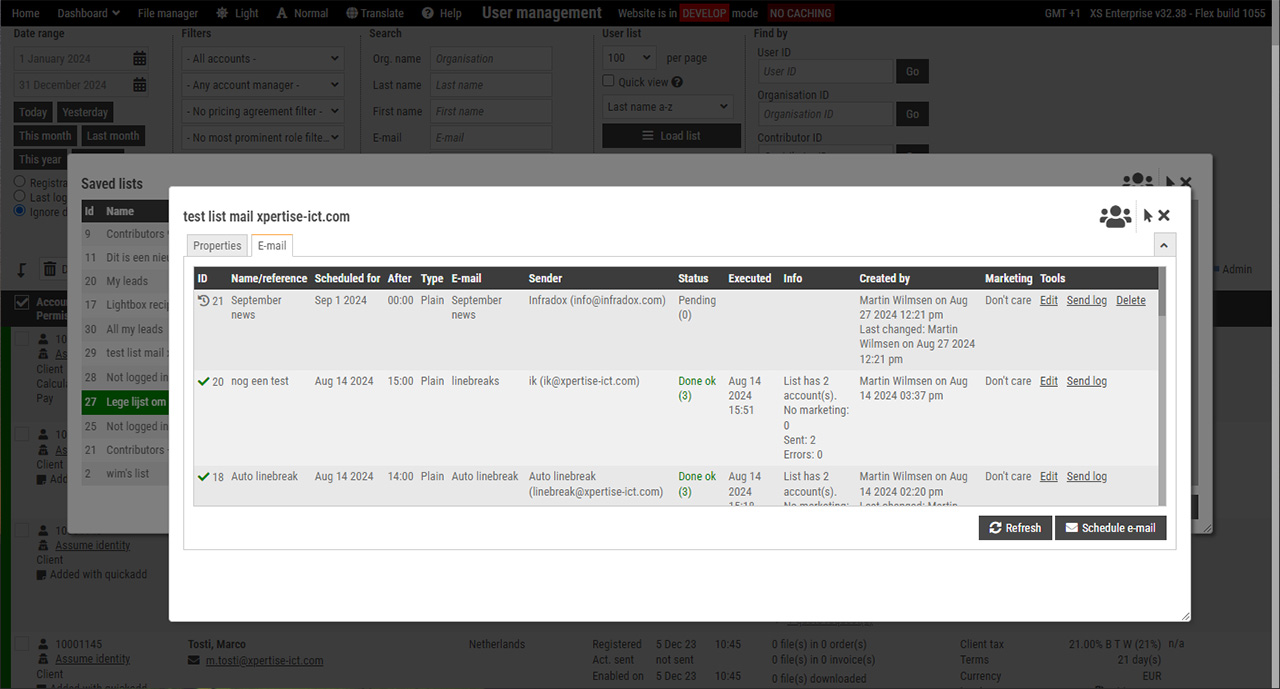
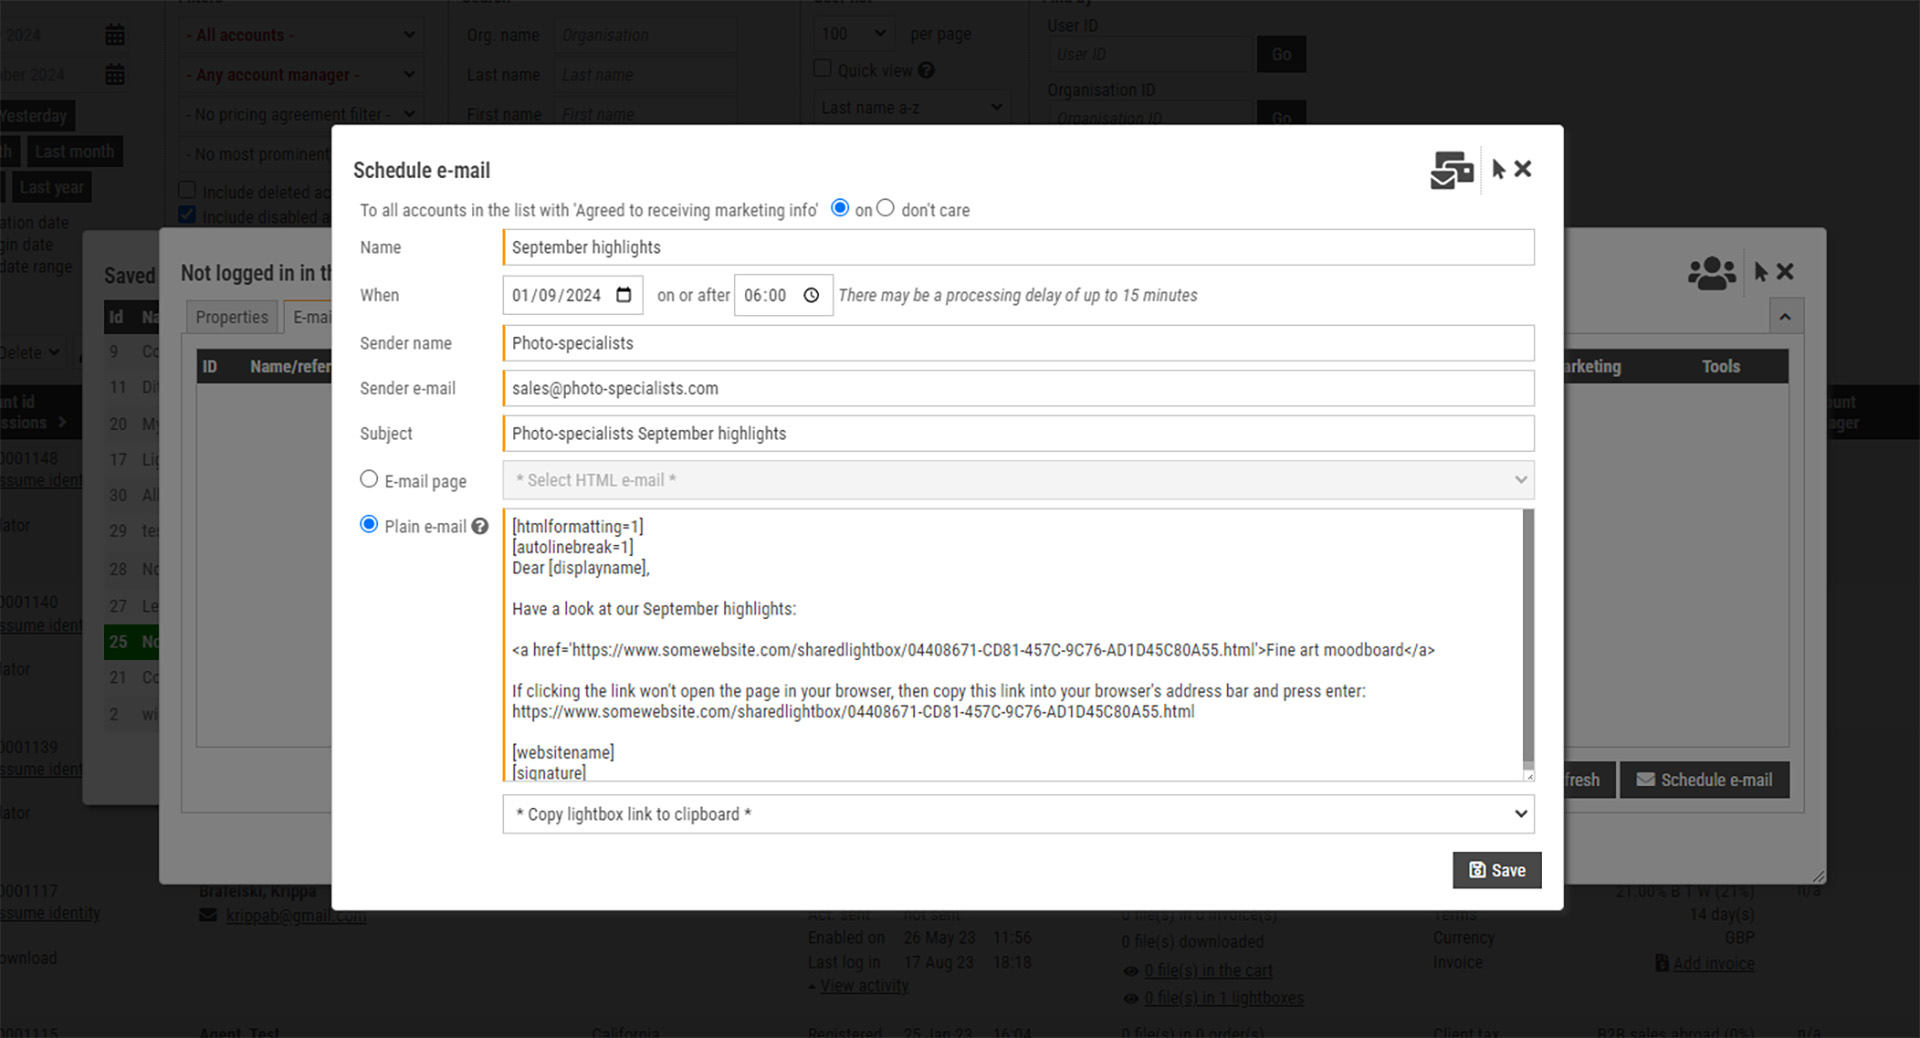
If you want to send e-mail to all users in one of your saved lists, then find the list in the “Saved lists dialog” and click Edit to open the properties dialog. Then click on the E-mail tab. At the bottom of the tabsheet, click on “Schedule e-mail”. You can now enter all the properties for your bulk e-mail. Note that you must always use a scheduled date and time in the future or your request will be automatically disabled (so don’t use a date/time in the past to have your e-mail sent immediately).

The top of the dialog lets you select whether or not you want to send mail to all accounts in the list with ‘Agreed to receiving marketing info‘ only. Use this to make sure that you don’t send e-mail to users who have opted out of wanting to receive e-mail from you.
This function lets you send normal (either plain text or HTML formatted) e-mail and it also lets you send HTML e-mails that you have created with the Pages function.
E-mail is sent asynchronously, on the date that you have configured and after the time that you have configured (the process may start several minutes later than the time that you have chosen).
To check if scheduled e-mail has been sent succesfully, open the Saved lists dialog. The columns “Last e-mail executed”, “E-mail pending” and “E-mail done” will provide basic succes and error information. Note that the column “E-mail pending” shows the number of scheduled bulk e-mail runs that are still waiting to be processed.
For more detailed information, click on Edit to open the properties dialog. Then click on the E-mail tab to see the scheduled e-mails. You’ll see info telling you to how many users the e-mail has been sent, how many errors there were and how many E-mails were skipped. Click on “Send log” to see the individual user accounts affected by the e-mail run.
Bulk e-mail testing
It is strongly recommended to create a test list (saved list) with at least two user accounts from users in your own organisation, or that are test/dummy accounts. Always do a test run with that list before scheduling bulk e-mail to real users.
Checking scheduled bulk e-mail
To check if there’s scheduled bulk e-mail, either click on “Scheduled e-mail” in the My list dropdown, or open the Saved lists dialog and click on the “View scheduled e-mail” button. This will list all scheduled e-mail, regardless of the list owner. The mail run that will execute first will show at the top of the list. A similar dialog is available to allow for quick access to recently sent bulk e-mail.
Sending a lightbox to all users in a saved list
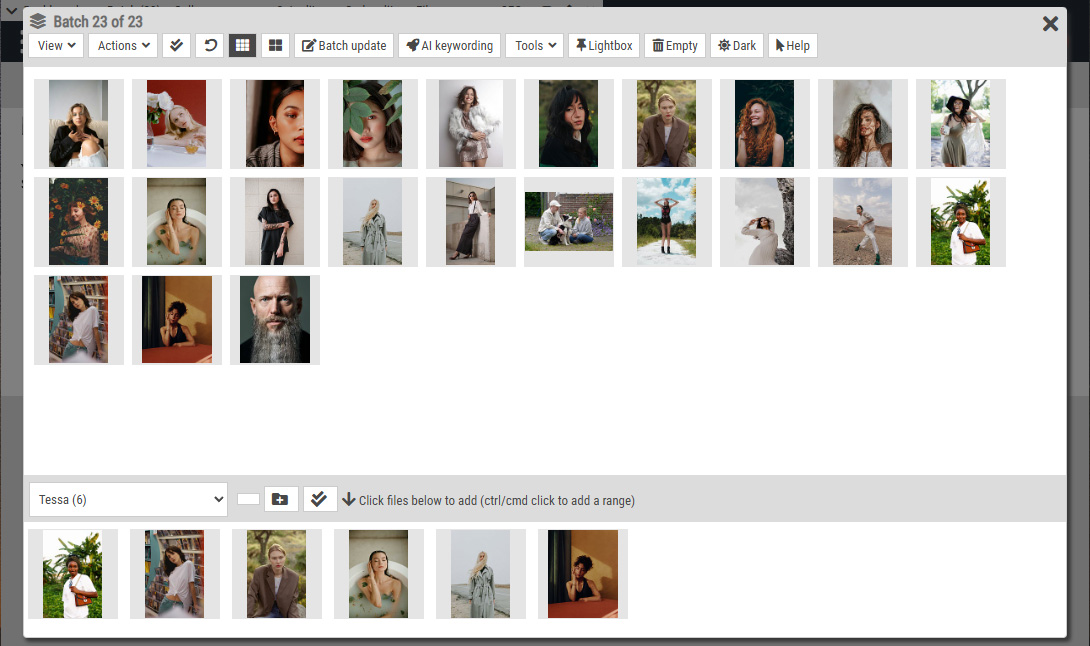
To send one or more lightboxes to all the users in a list, schedule a new e-mail as explained above. Select the “Plain e-mail” radio button in the dialog. The default template will display in the text box. Change the text as needed and then click on the “* Copy lightbox link to clipboard *” dropdown at the bottom. Now click on the lightbox that you want to send to have the URL copied to your clipboard. Position your cursor in the text where you want add the link and press Ctrl-V (Windows) or Cmd-V (Mac) on your keyboard.
Sending a lightbox
HTML formatting instructions and [codes]
If you use the Plain e-mail option then add the following instructions at the top of your message in the text box:
[htmlformatting=1]
This will send your message as an HTML formatted e-mail
[autolinebreak=1]
Use this so that you don’t have to add <br/> at the end of each line, these will be added automatically.
You can furthermore use these codes in your text: [websitename], [firstname], [lastname], [displayname], [emailaddress] and [signature].
User activity to see a user’s bulk e-mail information
Open the user dialog and click on the Activity tab. Then click the “Bulk e-mail” radio button at the top to load a log of bulk e-mail sent to the user.
Screen recording re bulk e-mail
The below recording has computer generated audio