This article describes how you can create a custom version of the gallery root page.
The default version of this page lists your (selected) gallery groups with a tree view on either the left or the right side of the page. When you click on a group, its galleries will be displayed. You can configure this page via Site configuration, Gallery pages, Gallery Root page. You can furthermore change the look and feel of this page by changing the CSS. If you want to completely customise this page, you can do that with the code editor – which is explained below.
Recommended reading: Using the code editor, Gallery management, Galleries as search categories.
Before you begin
You need to understand how the XS tags work and you need to know Script, CSS and HTML coding. If you don’t, then you can of course contract us or a third party to do the work for you.
How to load the page in your website
The gallery root page can be accessed with the URL /galleries/galleries.html.
The word galleries can be replaced with anything you want as long as the url starts with /galleries/ and ends with .html. For example /galleries/curated.html will also work. You can also create a URL rewrite rule if you want to use a different URL. This is explained here.
You can add a button or link with this URL wherever you want (e.g. in the main menu).
An explanation about this page
The gallery root page uses Javascript to generate the HTML. This is done so that random thumbnails can be displayed and so that a group’s galleries can be displayed on the same page after clicking on a group thumbnail. The script uses a data array with JSON objects (having the gallery data). The required script is automatically invoked if you use the default page, you’ll have to invoke it yourself if you create a custom version of this page. This is explained in the next paragraph.
Creating your custom page
Go to the code editor and select Pages > Gallery Root HTML in the drop down box. Click on Load examples, and load galleryrootpage-1.txt into the editor. We’ll use this to explain how to use the script and how to load the data array.
At the top of the template you’ll see a script block:
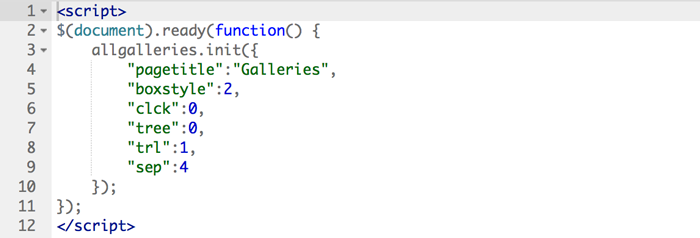
The above script is used to initialise and “draw” the page with a JSON parameter object. This object has the following properties:
- pagetitle: has the title you want displayed at the top of the page
- boxstyle: 0 for default thumbnail boxes, 1 for wide boxes. When you create a custom page, you can also use 2 for large thumbnails but you’ll have to create your own CSS (explained further down).
- clck: 0 to load galleries for a group in the same page, 1 to load the group page
- tree: 0 if you don’t want a tree to display, for the default page a value of one means tree on the left, 2 on the right. This is not relevant for the custom version because you control where the tree is with your HTML instead.
- trl: 0 to display a “trail” a the top of the page, 1 to display full context. Note that your HTML must have an item with the id “trail” if you want to use this. If not, then simply leave it out of your HTML.
- sep: lets you choose which trail separator to use, i.e. 0 for a dash, 1 for a comma and so on. You can find the other options in backoffice > Gallery pages > General settings.
The bottom of the page has another script block as shown below. The galleriesdatalist tag generates the JSON data array that this page needs.

- The first parameter must be ‘rootpage’.
- The second parameter must be 0 for normal thumbnails, or 1 for large thumbnails.
HTML
The actual page HTML is straightforward. The standard template uses a table with a column where the tree is inserted, and a column where the thumbnail boxes will be inserted. If you don’t want a treeview to show then remove the ul with the class gallerytree and the HTML inside this element. And change the tree parameter in the Javascript object to 0.
The div with id “boxes” is essential because this is where the script inserts the thumbnail boxes. This div doesn’t have to be in a table, you can position and style it anyway you want. The div with id “groupscontainer” is also required (you can find it in the example code).
A more advanced example
We have added another example that you can load into the editor. It is called galleryrootpage-2.txt.
This example uses a banner photo and large square thumbnail boxes underneath it. You can see how it will look in the screen shot at the top of this article.
Note that the CSS for this example is part of the template for the sake of clarity, but you should move it to the Custom CSS once you’re done.
The large photo is loaded with a JQuery call inside the document.ready function. You must of course change the file name to a file that exists (you can upload files via Site configuration > Website files).
Note that for this layout to work, the allgalleries.init() function requires the value 2 for the boxstyle parameter. And the data array tag has value 1 for the second parameter to load the large thumbnails.
Creating the HTML for the thumbnail boxes
The allgalleries script creates the HTML for the boxes on the page. It is also possible to create the HTML yourself instead. The example file galleryrootpage-3.txt has an example showing you how to do this.
You’ll need to add two methods to the allgalleries.init() JSON parameters, like so:
Next you’ll need to add the two functions that are being called, i.e. paintrootdiv() and paintrootgroups().
These functions are called to create the HTML for the root boxes and for the galleries within a root. The example file has these functions that you can change as needed.