
Introduction
With Infradox version 32.37 or later, you can use API’s to translate metadata and/or website text, HTML, labels et cetera. The infradox platform currently supports three major translation API’s:
Google Translate, Amazon AWS Translation, and Microsoft Azure Translation.
You can configure one or more of the above API’s, and you can then select the active API in back office (Site configuration > API integration).
Recommended reading
- AI keywording API’s
- How to configure localised keywords
- Working with the controlled vocabulary
- Data processing rules
- The metadata repository
Initial API configuration
Once you have created an account for each of the API’s that you want to use or test, you’ll need to send the API details to Infradox support. And Infradox staff will then add the configuration data for you on your web server. Once this has been done, you can go to “API Integration” in backoffice and you can select and configure the active API that you’re going to be using.
You can download the set up instructions (PDF) for the supported API’s below:
How you can use the translation functions
In addition to using the API’s to automatically translate metadata via Data processing rules, you can use the built-in tools throughout your website – as described in the following paragraphs.
Localised fields in backoffice
All fields in backoffice that support localisation now show a pencil icon after the input field. You can click this icon for a so called “input helper” dialog. Simply enter the text in each language input box to have the helper dialog create the correct output for you. But this tool also has a translate button that lets you translate text from the selected source input box to any of the other language inputs. Select the source with the radio buttons in front of the inputs, then select the target language in the dropdown box next to the Translate button. The translated text will appear in the target input box.
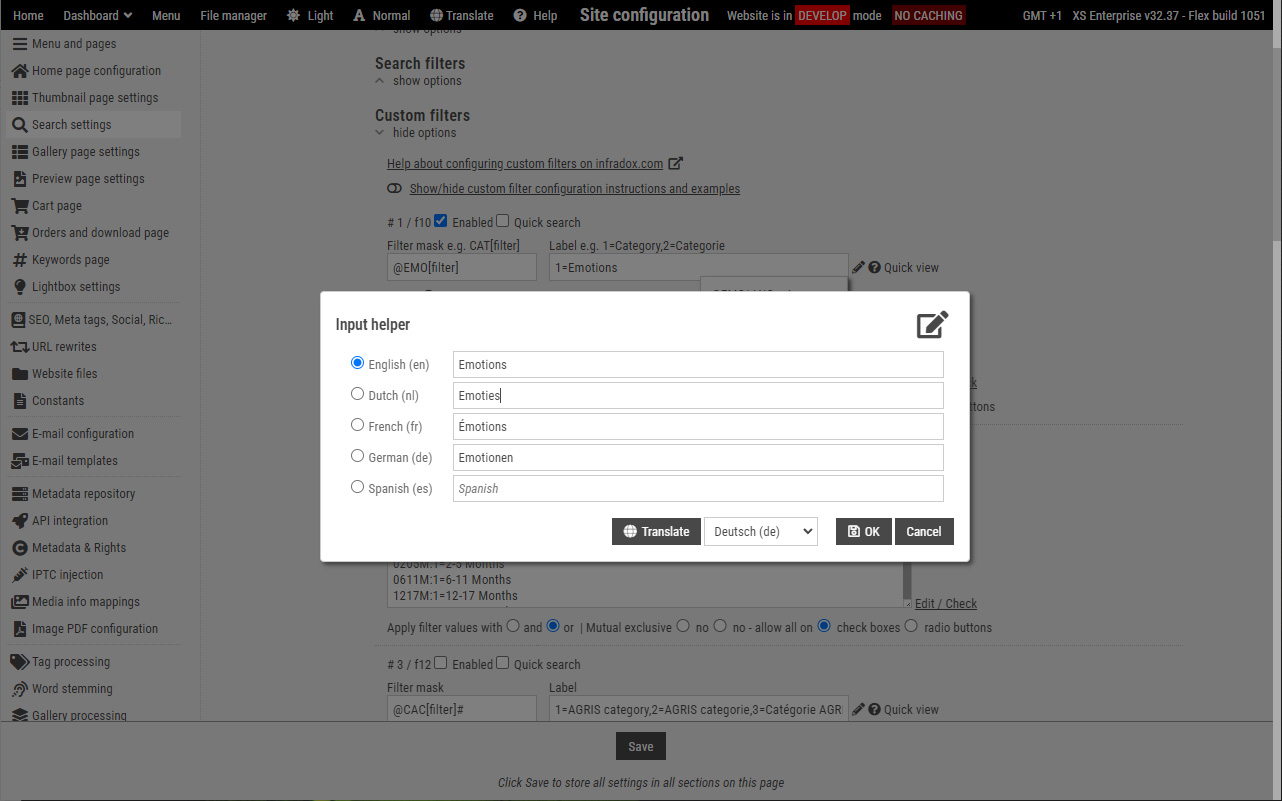
Input helper for localised fields
Translating galleries
The gallery manager has a translate button that opens the below dialog. You can untick the fields that you don’t want to translate. Click the translate button to fetch the target text and finally click Apply when your happy with the translation.
![]()
Translating a single gallery
Click on the “Quick translate” link in the gallery manager sidebar for the multiple gallery translation dialog (below screenshot) – to automatically translate all the galleries in the active group. Before clicking Translate you can remove galleries from the list and you can deselect fields that you don’t want to have translated.
![]()
Translating multiple galleries
Translating your HTML pages
The page properties tabsheet shows checkboxes in front of the input fields (screenshot). Click on the translate button to automatically translate the selected input fields. When the HTML source tab is active, either select text before you click on translate or simply click the translate button to submit the entire contents to the translation API.
![]()
Translating HTML page properties
The code editor
When working on files in the code editor, you can click Translate in the toolbar for a generic translation dialog. There’s also a “print tag helper” dialog (screenshot below). The print tag is used to display literal text in the active user language. The helper dialog has a translate button to automatically translate text for you.
![]()
The code editor ‘Print tag helper’ with translate function
Anywhere in backoffice, e.g. User management, Quote management, Order management and so on
All backoffice functions let you click on Translate in the toolbar for a generic translation dialog. Use it to translate any text.
Metadata dialog
The metadata dialog displays a globe icon after each field that can be a translation target, i.e. standard input fields and large text boxes. Click on the icon to open the translation dialog. The field text will appear in the language source box. Select the target language and then click translate at the bottom.
![]()
Metadata edit dialog with translate function showing
Automatic translations with Data processing rules
You can create Data processing rules in backoffice to automatically translate data as part of your ingestion workflow and/or data processing procedures. Creating a processing rule for translating text is as simple as choosing a source and target field and a source and target language. The source language can also be set to “detect”. For further information, please read the articles about Data processing.
Costs
The API integration page will show you for each API how many characters you can have translated without any costs, and what the costs are if you exceed these thresholds. To prevent or to limit costs (e.g. while you’re still testing or deciding which API best suits your needs), you can enter a number in the “Maximum requests” input box and you can enter the maximum number of characters to be translated. Once either has been reached, further requests will not be executed until the next time period (i.e. day or month).
All API requests are logged and you can check how many requests have been made and how many characters were submitted for translation – via Website logs, Statistics in backoffice. Depending on the API that you are using, you’ll have to add credits to your account beforehand or you’ll be billed at the end of the month by the API provider (i.e. Google, Amazon or Microsoft).
Other configuration options
Go to Site configuration > API integration in backoffice and open the section “Translation API’s”.
Besides the maximum number of requests per day or month, you can also configure the maximum number of characters to be submitted for translation.
You can enable the translation function in the metadata edit dialog for admins, for contributors or both.
