In version 31.2 or later, you’ll find the File manager button in the Admin toolbar at the top of your screen. The File manager is used to manage your website’s assets, e.g. your logo files, slide show images, watermark files, home page images, PDF files, text files for several of the Infradox functions and so on. You can upload files, resize images, remove files, rename files, add folders and so on. Note that you can still upload specific files via Site configuration, Website files too. The File manager however, can be used at anytime regardless of the page that you are on (i.e. you don’t have to go in to Back office first).
The above screen shot shows the File manager button in the admin toolbar. To enable the toolbar, select it in the “My account” drop down menu.
Using the Website file manager
To open the File manager, click on the button in the toolbar at the top of the page. The File manager is available on the client facing pages and in Back office. Note that the File manager function is not used to upload files for your database, it is used to manage website assets for the client facing pages only. Scroll down for an overview of the different website folders and what the folders are used for.
The tree view panel
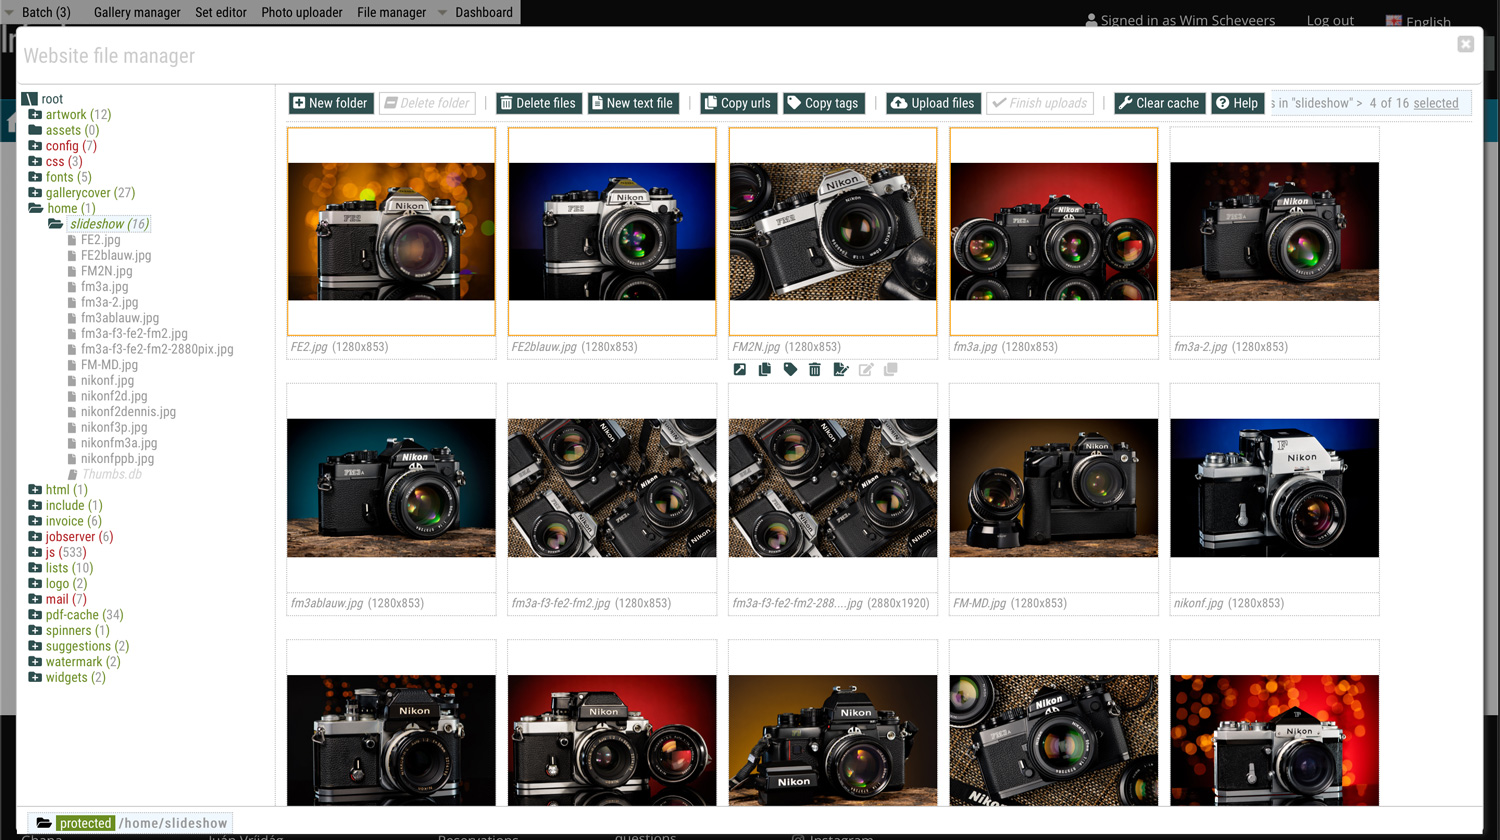
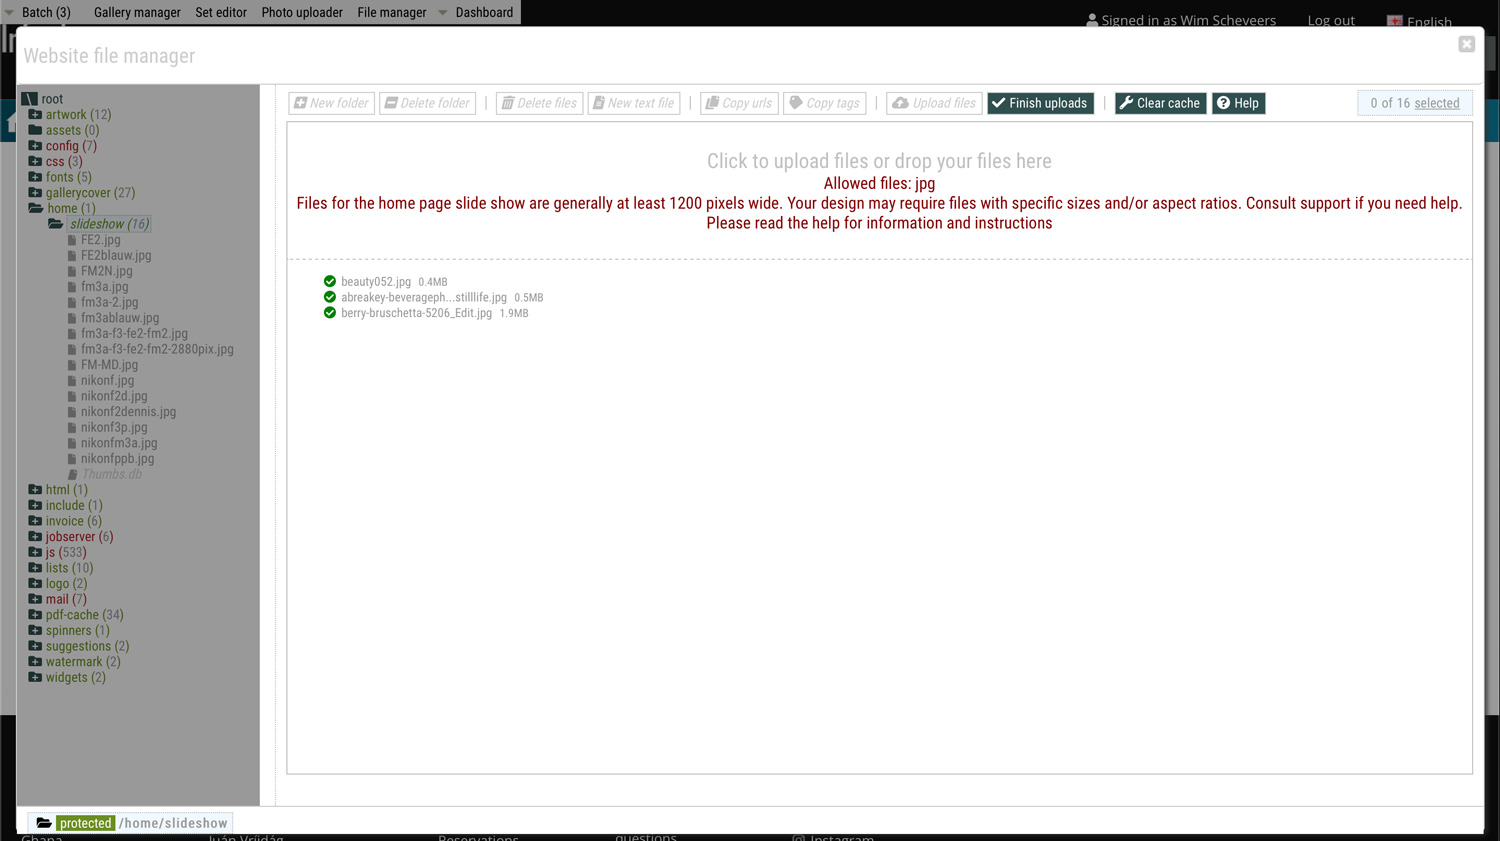
The below screen shot shows the File manager dialog. The tree view on the left shows all the folders that you can access, the main panel shows the contents of the currently selected folder in the tree.
Folder names (in the tree) that are displayed in green are so called “protected” folders. This means that you can create folders inside these folders, that you can add, delete, rename and change files – but you can not delete the folder itself. Protected folders are generally folders that are used by the system’s functions, e.g. to display slide shows, to populate lists on forms such as the registration page and so on.
Folder names that are displayed in red are “read only” folders. You can view the contents of such folders and you can open the files in the folders, but you can not change files in such folders – with the exception of the folders /mail and /config. You can edit files that are already in the locale sub folders that exist in these two folders. Files in these folders show a lock icon in front of the file names (because the folder itself is read-only), but the lock is green to indicate that editing is allowed. The config folder is where changed constants files are stored, being able to access the folder with the File manager makes it easy to see which files you have changed and to easily make changes. The mail folder stores changed e-mail templates.
You can click on the folder icons in the tree to expand or collapse the node. Click on the folder name to display its contents in the main panel. If the main panel also displays sub folders, then you can also click on a sub folder icon in the main panel to open that folder.
The main panel / folder contents
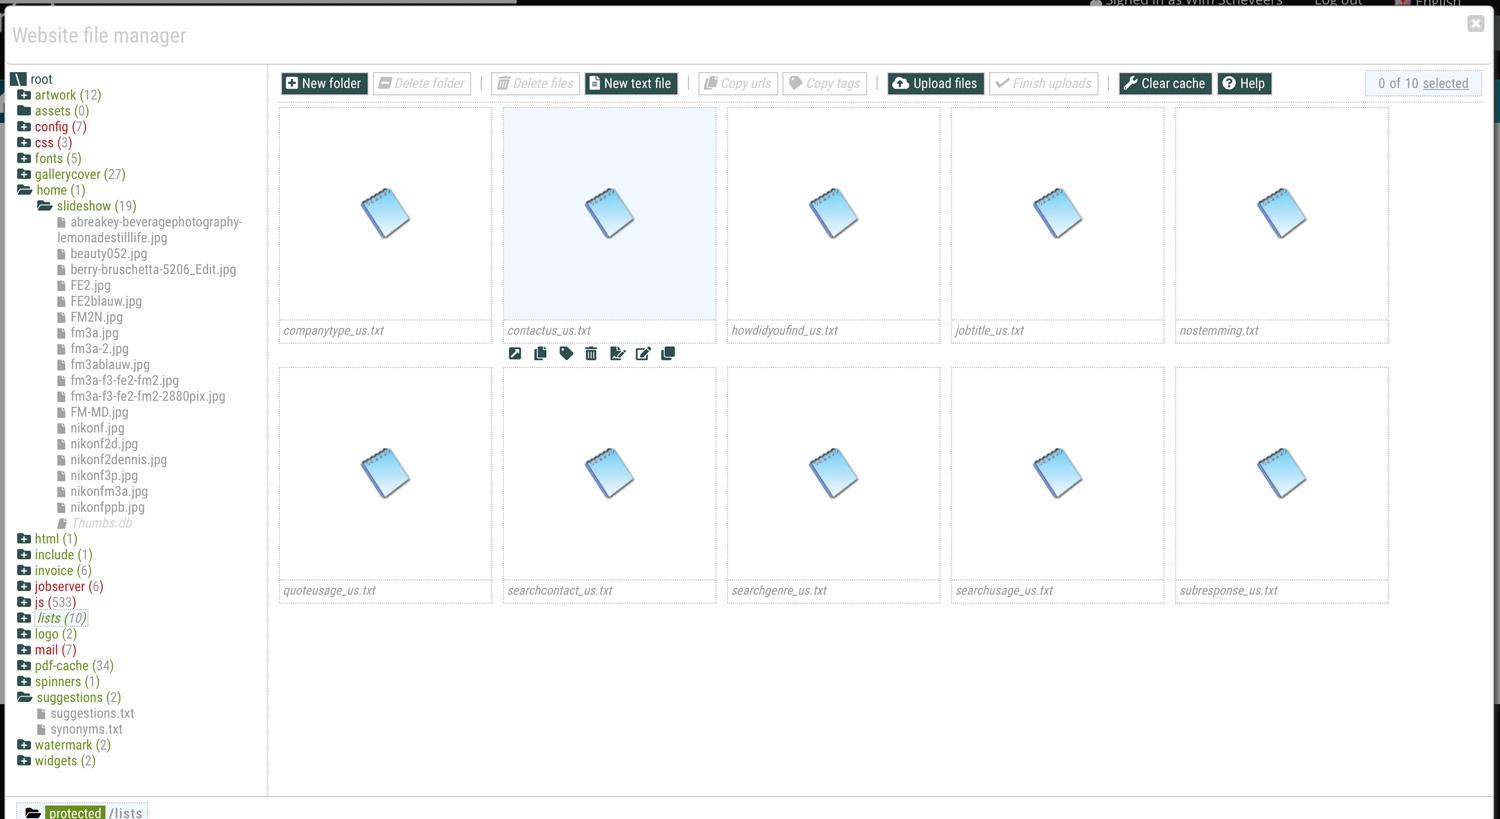
The active folder (i.e. the folder for which contents are showing in the main panel) is high lighted in the tree view on the left. Underneath each item in the main panel, the file name is displayed – and if the file is an image you’ll see its dimensions (size in pixels) between brackets. Long file names may show only partially, in which case you can hover over the name to display it in full.
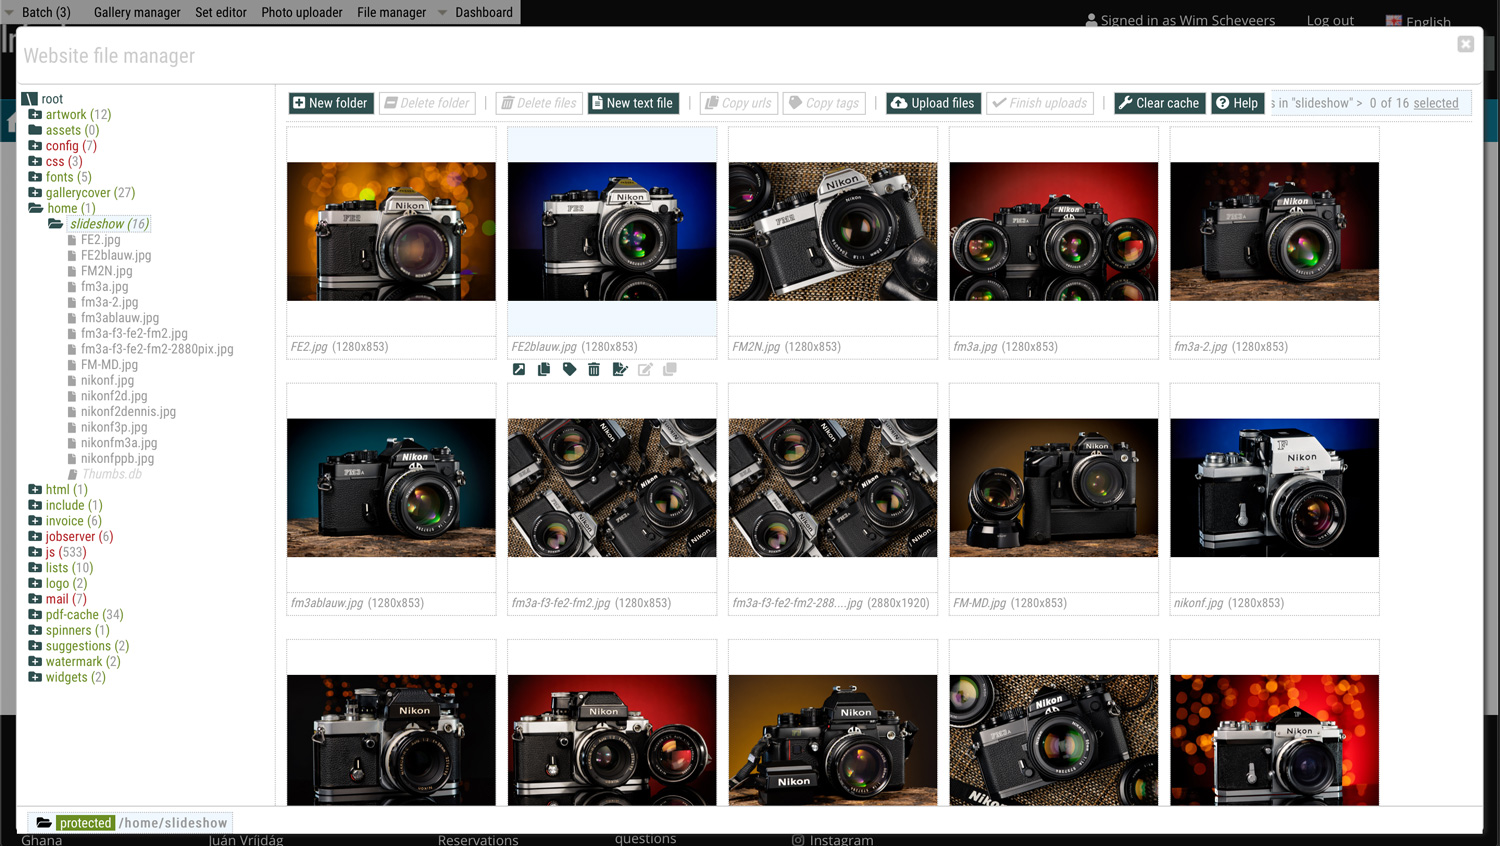
Hover over a file in the main panel to show the tool buttons available for that file. In the above screenshot you can see the tool buttons underneath the second photo at the top. The file tool buttons offer the following functions (from left to right):
- Open file, click this button to open the file in a separate browser tab or window.
- Copy file url to clipboard, this copies the relative path to the file to the clipboard. You can then paste it using ctrl-v (or cmd-v on Mac). If you hold ctrl (or cmd) when you click on the button, then the url is copied and the File manager is automatically closed.
- Copy file tag to clipboard, this will copy a img tag (if it’s an image) or a href tag (if it’s another file type) to the clipboard. Hold ctrl (or cmd) to copy and close the dialog.
- Delete file, removes the file from the folder – note that this can’t be undone.
- Rename file, opens a file rename dialog (note that you can create a blank text file with the button in the main toolbar).
- Edit file, click to edit files of type txt, js, xml, inc and html.
- Clone file, click this button to create a copy of the file. Its file name will be the same as the source file with a number added between brackets – e.g. myfile(2).txt. You can of course rename the new file to any other valid file name by hovering over it and then click the Rename button.
Which of the above buttons are enabled, depends on the folder that you are viewing and on the file type. E.g. you can edit text, js, css and other files using the File manager, you can not edit e.g. image files.
The main toolbar
The toolbar above the main/contents panel lets you create new sub folders, and remove subfolders – note that protected folders can’t be deleted, but subfolders inside such folders that you created yourself can be deleted. From the toolbar, you can furthermore resize images, delete many files at once, copy urls (relative paths) and/or tags for many files at once, and it lets you upload files and create blank text files.
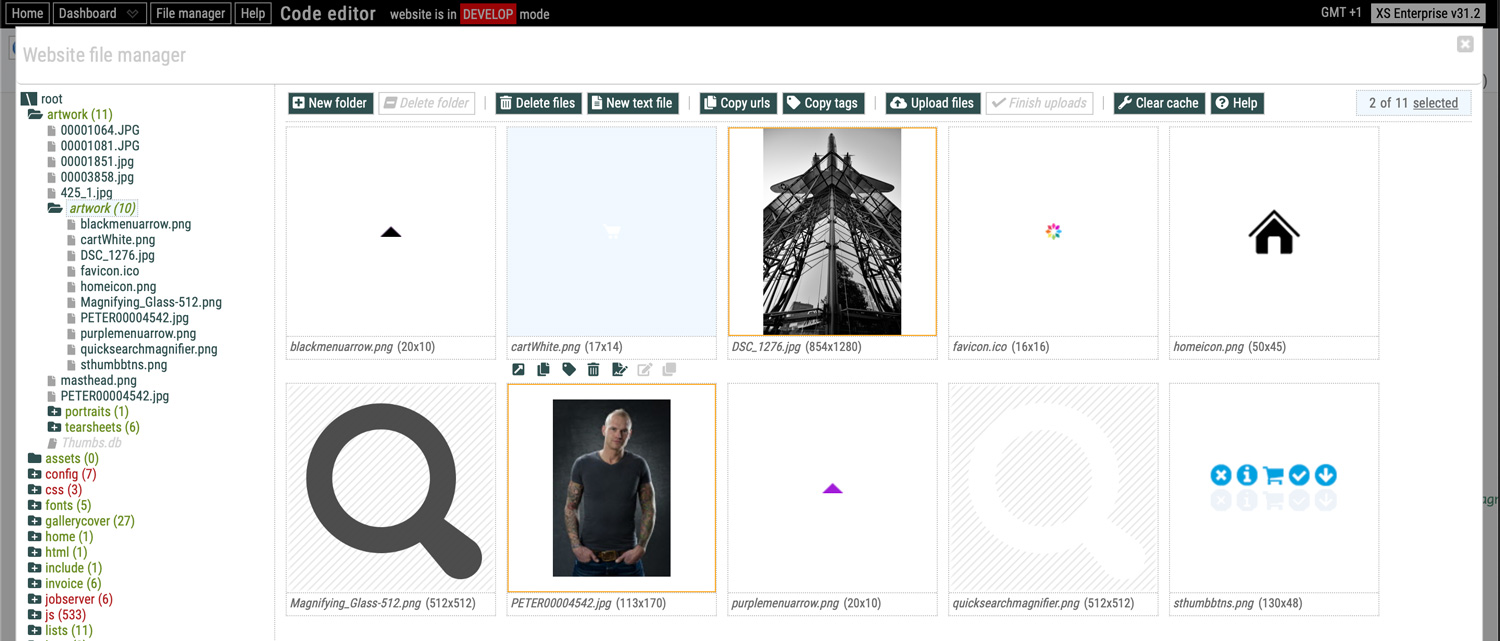
To select files, simply click on the file in the main panel. The right side of the toolbar shows you how many files you have selected. You can also select all files all at once by clicking on the selected link in the toolbar on the right. To unselect all files, hold down ctrl or cmd (on Mac) when you click on the link. The below screen shot shows two selected files, selected files are shown with an orange border.
Inserting tags into the HTML that you are editing
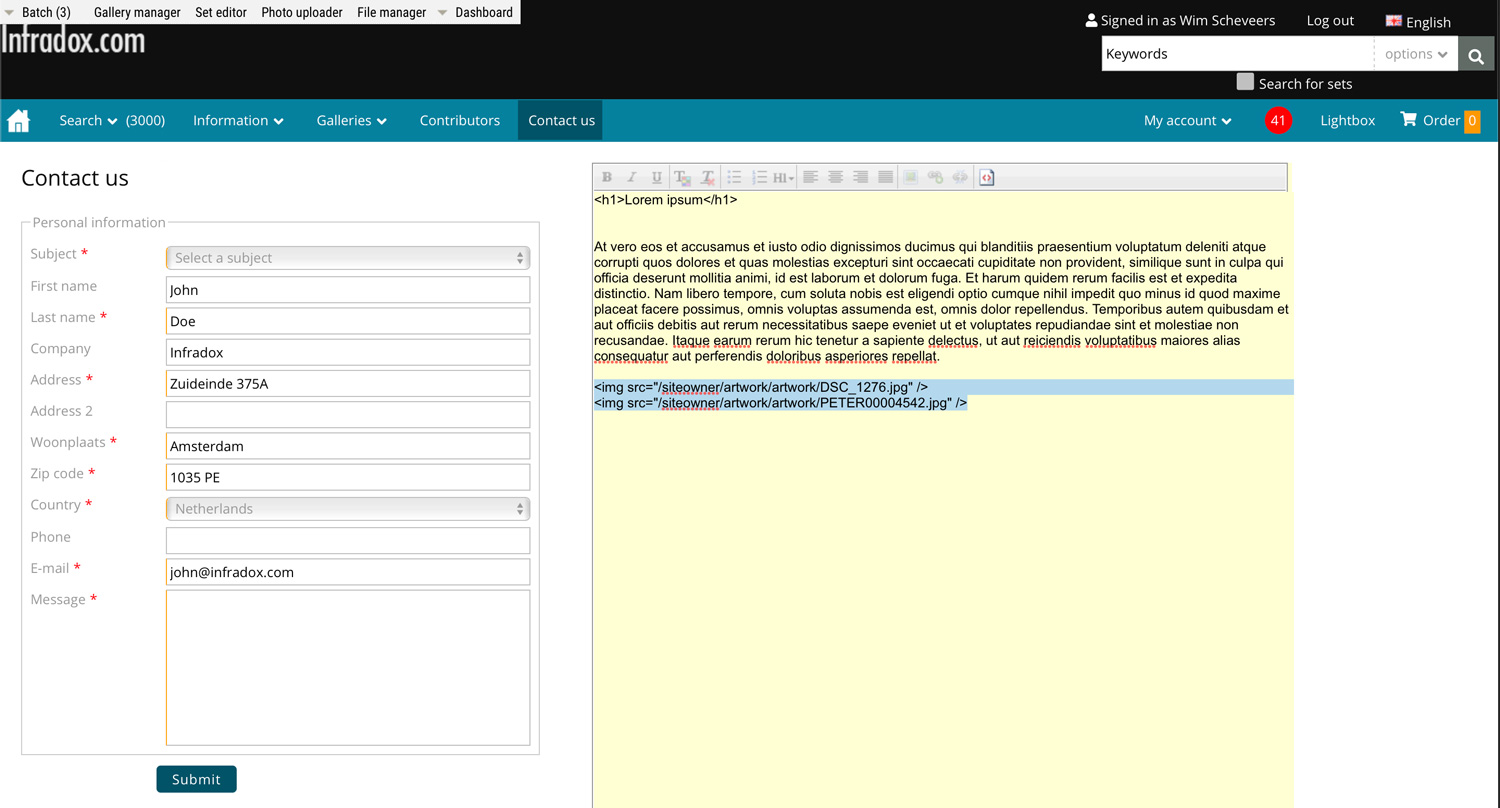
You can copy the image tags of multiple files into the HTML of a page that you are editing (see below screen shot). It’s best to switch to HTML mode by clicking the right most button in the toolbar above the HTML edit box (below). In the File manager, select the images that you want to insert in the HTML, then click Copy tags in the toolbar and close the File manager (or hold down ctrl/cmd when you click the button). You can now use ctrl-v on a PC or cmd-v on a Mac to insert the image tags that are on the clipboard. Note that the File manager can also be used when you are editing a file with the Code editor.
Functions to list files in custom pages
You can add files to your pages by inserting img tags as described in the previous paragraph, but there are also a number of widgets that you can use in your custom pages. For example the listimages widget that will simply output all the files in a specified File manager folder.
<?xs widget(‘listimages’,{path:’assets\portraits\*.jpg’,usedivs:1,dynamicloading:1}) ?>;
You can find examples in the code editor folders – just click on Load example when editing a custom page/template in the code editor.
Uploading files
In addition to being able to upload files from Site configuration, Website files – you can use the File manager to upload files without having to go into Back office first. To upload files, first select the folder in the tree view and then click on Upload files in the toolbar. The types of files that you can upload depends on the folder that you have selected. For example, the folder home/slideshow is used by the home page slide show function, and it will only let you upload jpeg files. The fonts folder will only let you upload font files, and so on.
Certain folders require files with a specific file name. An example is the Watermark folder. The files in this folder must be named:
watermark.png – the watermark that is used on your preview images, and
compmark.png – the watermark that is used on your comping images.
You can upload other files into the folder but the watermarking function will use the above files only.
You’ll see relevant instructions at the top of the main panel which will vary depending on the folder.
To upload files, simply click on the instructions (see screenshot) to open a file select dialog, or drag files onto the main panel. When you are done uploading files, click on Finish uploads in the toolbar. This will reset the File manager to the normal view and your new files will show.
Important, file names are case sensitive, please upload files using lower case only. Use relatively short file names and do not use file names with letters and numbers only. Dashes, underscores, and @ are also allowed. Each file that you upload must have a valid file extension (the part after the dot – for example mytextfile.txt). The uploader will tell you which file extensions are allowed.
Resizing image files
You can resize images by selecting files in the main view and then click Resize files in the toolbar to open the resize dialog. Enter a size in pixels, e.g. 800 – for 800 pixels on the longest side. If you check the box “Keep original files”, then the new (resized) files are stored with the original file name with the size appended to it. E.g. test.jpg will be saved as test_800.jpg. If you don’t want to keep the original files then the new files are simply stored using the same file name – i.e. the files are overwritten. Note that with the latter option, sometimes your browser may take files from its cache causing it to look like the files didn’t change. If that happens then clear your browser’s cache.
Editing text files with the File manager
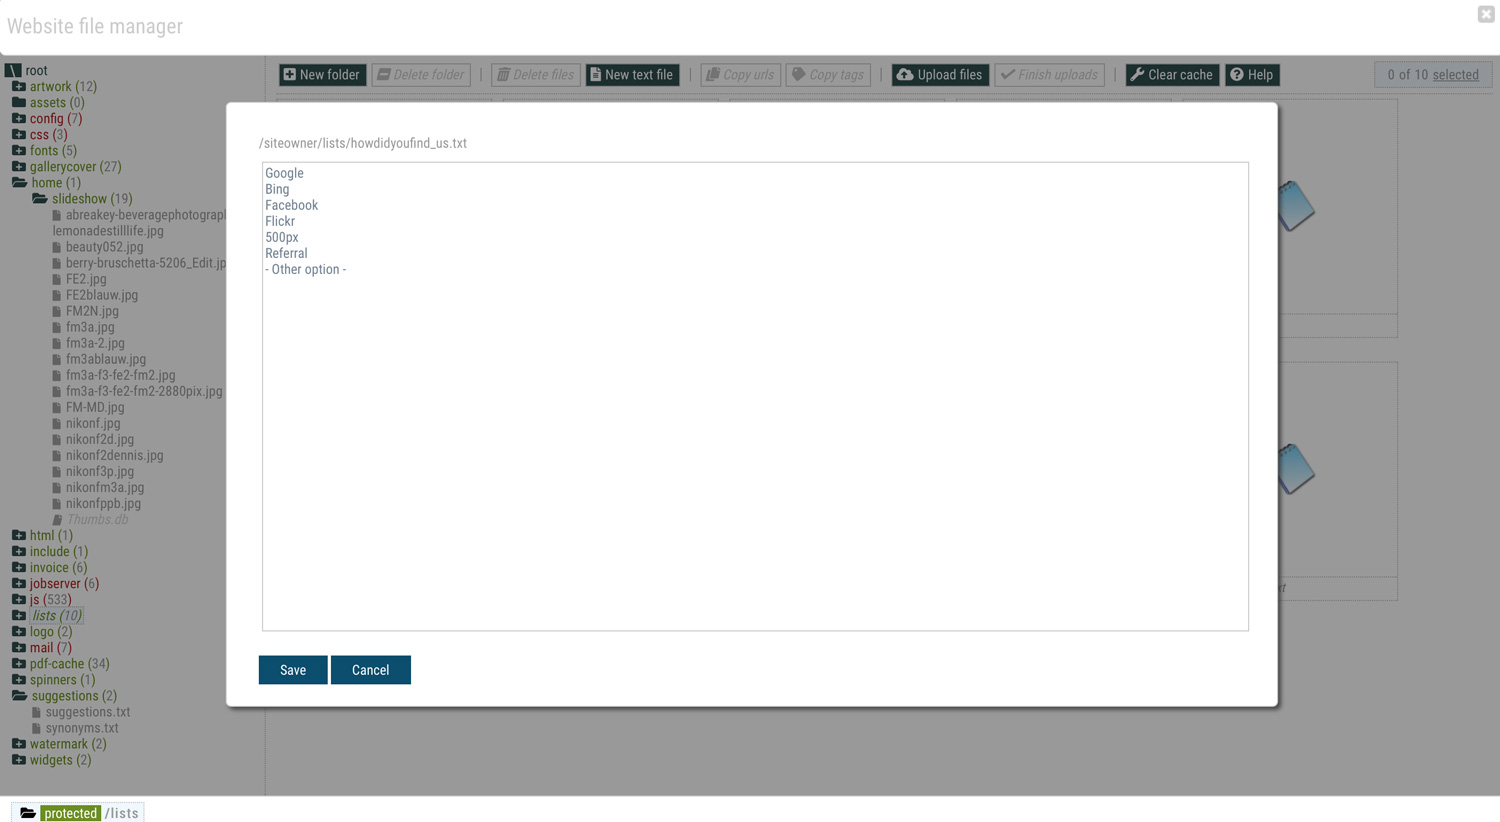
Several website functions use text files that you can upload via Site configuration, Website files. This function will show instructions regarding the required file names and file contents. For example, the text file companytype_us.txt is used to populate the company type drop down on the registration page and the account page etc. when English is the active user interface language (the _us part means it’s for the English language). Because of these requirements, it may be easier to upload the files using the Website files function instead of the File manager. However, the File manager lets you edit files already online, without having to edit such files off-line and then having to upload the file again.
To edit a file, hover over it in the main panel, and then click on the Edit button (see below screenshot).
A dialog will appear with the contents of the text file showing in an edit box (below). Simply change the contents as required and click Save when you are done.
Server side caching
The File manager will not automatically flush any of the website caches. If you have made changes and you don’t see your changes on the client facing pages – then click on the Clear cache button in the File manager’s main toolbar. Note that it is advised to check if it’s necessary to clear the cache folders, before you use the clear cache function. If for instance you have replaced images but you have used the same file names, then you may still see the old images on your client facing pages and/or the file manager. This however is your local browser cache, not the server cache. It’s therefore better to you use new file names because you can’t control the browser cache of your users.
Read only folders
As explained in the previous paragraphs, some of the folders that you can see in the tree view are read only. This means that you can view/open files in such folders – but you will not be able to make changes, nor will you be able to select files in the read only folders. Files in these folders have a red lock icon in front of the file names, and the folders are displayed in red in the tree view. These folders are read only because making changes would interfere with website functions.
However, there are two read only folders that have files that you can edit from within the File manager, these are the /config and /mail folders. The file names show a green lock icon (not a red icon). This means that you can change and save such files. The folder itself however is read only and other manipulations (besides editing files already in there) are not allowed. Read below for further information about these folders.
Access to these folders is furthermore provided to review the status of certain functions (e.g. the job server function), to quickly see which files you have changed and stored as local copies (e.g. constants files in the /config folder and mail templates in the /mail folder). You can also view all previous versions of your custom CSS (/css folder) and custom Script files (in the /js folder).
The Posterfiles folder (processing)
The “posterfiles” folder lets you upload jpeg images that you want to use instead of the automatically generated web representation files (i.e. thumbnail and preview images). This function is for example used to replace the wave form image that is generated as a web representation file for audio files – e.g. with an album cover. You can however upload poster files for any file, regardless of the file type. Poster file images must be 1000 pixels on the longest side and the file name of a poster image file name must be the 8 digit Infradox number (left padded with zeroes) and it must have the .jpg file extension. Poster images are automatically removed from the folder once processing begins. The 1000 pixel file is used to generate all required web representation files. When a file for which a poster image exists is ordered/downloaded, the actual file will of course be downloaded – not the poster image file.
System folders
This paragraph describes the folders that you can use in the File manager and their purpose within the Infradox system.
- artwork
This is a generic folder intended for all sorts of images that you want to use in your client facing pages. By default it has three sub folders (artwork, portraits, tearsheets), but you can add other subfolders too. - assets
This folder is used to store all sorts of files that you want to use, it can have images, PDF files, video files and so on. You can organise your files in subfolders if you wish. - config
This folder stores so called local copies of constants files that you have changed via Site configuration, Constants. Files are in sub folders for each of the locales that your website uses. This is a read only folder but you can edit files in the locale sub folders.
- css
The CSS folder stores the currently active compiled CSS. Its file name is the technical name of your website followed by its version number. The CSS file is a compiled file with CSS for the selected theme/style, colors that you have selected via Website Style, the CSS for the selected options (e.g. custom radio buttons, Font Awesome icons etc.) and the custom CSS that is added in the Code editor. - fonts
If you want to use self hosted fonts, then you can upload the files into this folder. Also read this Fonts article for further information. - gallerycover
Stores the cover images that you have uploaded for gallery and/or gallery group pages. - home
The home folder has a subfolder called slideshow. This is where you need to upload files for the home page slideshow function. - html
You can upload custom HTML pages into this folder. Generally speaking it’s better to use the built-in functions for custom pages instead. Please read Adding custom pages for further information. - invoice
This folder stores the logo image files that are used in your invoice PDF’s and sales report PDF’s. The logo files must be jpg files (the .jpg extension is also required). The file name for the invoice PDF must be invoicelogo.jpg and the file name for the sales report PDF must be salesreplogo.jpg. Note that other files will be ignored by the PDF functions. - jobserver
This is the (read only) working folder for the Job server function, you can view the contents to check progress but the folder contents are managed by the Job server function. - js
The js folder stores all versions of the javascript that you can edit with the Code editor. - lists
This folder stores the text files that are used for various website functions/pages. Specific file names are required for such functions to work as expected, which is why you should upload your files using the Site configuration, Website files function. You can however change files already uploaded using the File manager’s edit function. - logo
If you are using the standard templates then this is were the HTML expects the file logo.png. If you have a custom banner (in the Code editor) then you can of course use any logo, using any file type and stored in any of the folders. - mail
The mail folder has subfolders for the different locales and stores the local copies of mail templates that you have changed. This is a read only folder, but you can edit files already in the locale subfolders from within the File manager dialog. - pdf-cache
This is the cache folder where generated lightbox and gallery PDF’s are stored. You can delete files from this folder. - spinners
The spinners folder is where you need to upload the file tspinner.gif (exact file name and type) if you have enabled the Dynamic thumbnail loading function. This file is referenced in core.css. - suggestions
Stores the text files for the suggestions function. - watermark
This folder stores PNG files that are used to overlay watermarks on preview and comping images. The watermark file for preview images is watermark.png and the file for the comping images is compmark.png. Both files must be PNG files using transparency and stored as RGB colour files. Both sides may not be longer than 300 pixels. You can configure if and how watermarks are applied via Site configuration, Preview page. - widgets
This folder stores files that are used by the different widgets that you can use in your pages. For more information, read the article about this subject. - uploader
In this folder you’ll find xml data files that can be saved from within the HTML uploader. Such templates can be used to quickly apply data to files that you (or your contributors) are uploading. You can edit the files with the File manager but it’s important that these files must be valid XML. If you’re not sure what valid XML is then it’s best to not edit the files. Just create them from the uploader instead. - documentation
This folder is reserved for PDF files with specific instructions for your website. E.g. if you have custom templates, there will be information about how to update such pages. - posterfiles
This folder lets you upload poster files to replace the default thumbnails and previews as described above. - ipblock
This folder stores the file blockedip.txt which has the dynamically blocked IP addresses. You can edit this file directly, but it is recommended to use the function Site configuration > IP addresses instead. - placeholder
The placeholder folder has the place holder images that are used as web representations of files for which there is no jpeg thumbnail and or preview. Place holder images are .png files that must be 980 pixels high and 850 pixels wide. The images have names that are the extension of the file types for which they are used. E.g. doc.png is used as the place holder image for .doc (and .docx) files. You can replace the images with your own files if you want.